Index of stuff on this page...
12/27/21 - a recap... The archived oldcomp/index
page documented some of my experiences playing around with
emulated old computer systems from about 1998 to 2007, first under
Windows 95 but some time before 2005 I started playing around with
various Linuxes including DSL, Knoppix and eventually Ubuntu. Just
rediscovered select.. forgot about that one. Ubuntu
Notes covers my experiences with Ubuntu from 2006 to 2011,
when I finally got a 3ghz quad-core machine with Ubuntu 10.04
pre-installed. The comp/index
page covers from 2011 to 2012, transitioning from Gnome 2 to
Gnome 3 and
figuring out how to make the new Gnome 3 components work the way I
want them to (you know, like Windows 95 but better with two panels
and a real OS under it all). Ubuntu Stuff covers from 2012 to 2020,
when I got my current 3.2ghz hex-core system with Ubuntu 20.04 and
gobs of ram and storage. More Ubuntu Stuff covers my efforts to
tame Ubuntu 20.04 and the newer Gnome 3 into something I can use
(a mixture of Gnome 3 and MATE components), but more and more I
can focus on coding and cool software and less on the operating
system.
Since 2005 a lot has changed with desktop Linux, mostly for the
good. It's still not perfect but things work better than they ever
have, open-source applications approach and often exceed the
quality of commercial software. While commercial support is still
nothing like it is with Windows, the platform now attracts the
attention of major players, including Microsoft and . PCB software
for Linux is coming along, I can make KiCad work but I prefer an
older version of Altium Designer which I run in a Windows 7
VirtualBox window. Recently I installed a Windows 10 VirtualBox VM
for more modern Windows stuff (Solidworks Viewer etc) but it's a
LOT slower than my 32-bit Windows 7 VM. Ubuntu Linux and
VirtualBox (or VMware) makes it a safer to run an outdated copy of
Windows, basically reducing it to a large file that can be backed
up and restored, and I don't have to surf the web from within
Windows, instead I can find what I want on the native Linux side
and copy it to a shared folder. Wine has gotten quite good at
running simpler Windows software natively, I use it almost daily
to run IrfanView for image editing and LTspice for simulating
electronic circuits. When I started with Linux it did good to play
audio without glitches, now I can run Ardour and mix tracks with
studio quality output, and transmit audio to bluetooth devices
with per-device latency compensation then somehow the apps know to
send the audio a specified interval before the video - that's just
cool. I can stream NetFlix and play high resolution movies full
screen, pre-2011 my systems could barely play video. My system now
can do pretty much everything I want it to do, with few bugs. Of
course there are always bugs in a complex system but once
workarounds are found minor bugs become more like a quirky
personality.
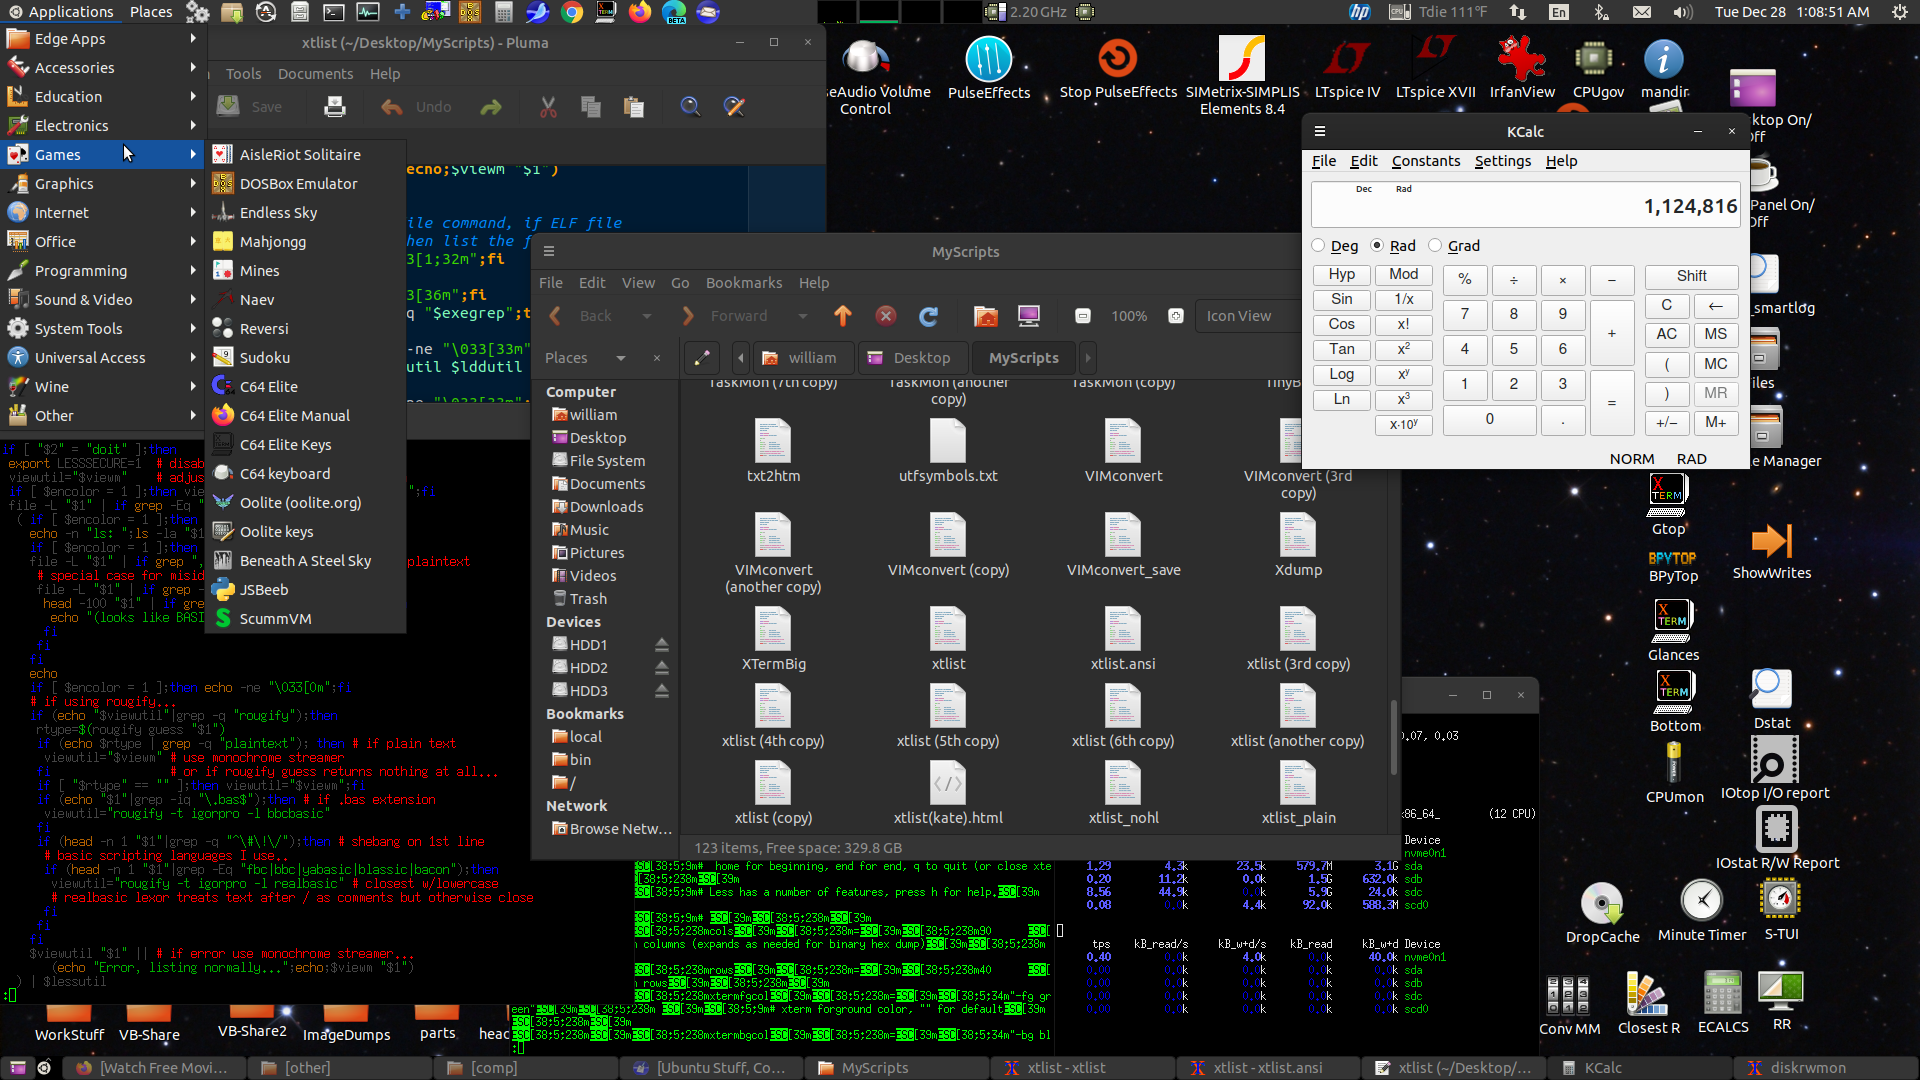
Here's my present desktop running a few things...
Contrived for the screenshot but it basically looks like that
when I'm working. The desktop environment components are Gnome
Panel aka Flashback, Caja for the desktop (Ubuntu's desktop
component has to be disabled), and the mutter compositing window
manager. The session was made from a copy of the default flashback
session, mostly just hacking in what I wanted to run (documented
on previous pages).
It works pretty much like the old Gnome 2 and the new MATE, and
works sort of like earlier versions of Windows from 95 to 7 except
it has a separate panel for tasks. I tend to have a lot of tasks.
Frequently used app and folder shortcut icons are placed around
the edges so I can quickly get to them, I almost never maximize
windows unless it's a video or something, when working I need to
quickly shove windows around as needed. Tasks are per-window so it
only takes one click to focus that window. It has an organized app
menu that only needs mouse moves and a click to find and run apps.
The desktop is essentially the root of my file system, with links
to files and folders, actual files and folders, and desktop
shortcut files. I need to be able to do (a complete set of) file
manager things with the files and folders on my desktop. Nautilus,
the Gnome file manager, can no longer handle the desktop so at the
start of the session it runs MATE's Caja file manager for the
desktop (caja -n --force-desktop). The apps in the screenshot are
a few xterm windows running various things, the Caja file manager,
MATE's Pluma text editor and KDE's calculator.
1/13/22 - I've been using my VIMconvert script to colorize
source code on my pages and I like the way it looks for most
things, but that script is rather complicated - not only does it
depend on VIM but also rewrites VIM's output on the fly. When
working on the color version of my xtlist script
I found something called "rougify" from the ruby-rouge package, I
usually prefer VIMconvert but rougify is a lot simpler and it's
always nice to have choices. Here's a "rougify_convert" script I
made, colorized by itself using the "igorpro" theme... [updated
1/21/22]
----------- begin rougify_convert ------------------------
#!/bin/bash
# rougify_convert 220121
# highlight source code using rougify from ruby-rouge package
# convert to html using ansi2html from colorized-logs package
# uses seamonkey to display html
# also uses zenity and sed
# usage: rougify_convert filename
tempdir="/dev/shm/rougify_convert_tmp" # ansi/html files will be left here
browser="seamonkey"
browserparms="--new-window"
browserprefix="file://"
defaulttheme="igorpro" # defaults if nothing selected
defaultbgcol="White"
if ! [ -f "$1" ];then exit;fi # exit if file doesn't exist
set -e # exit if error so zenity cancel works
mkdir -p "$tempdir"
fname=$(basename "$1")
ansiname="$tempdir/$fname.ansi"
htmlname="$tempdir/$fname.html"
# get list of rougify themes.. this works with 3.15.0
themelist=$(rougify help style|tail -n 1|sed -e "s/,/ /g")
theme=$(zenity --title "rougify_convert" --text "Select theme..." \
        --column "" --hide-header --list $themelist)
if [ "$theme" = "" ];then theme=$defaulttheme;fi
bgcol=$(zenity --title "rougify_convert" --text "Select background..." \
        --column "" --hide-header --list "Default" "White" "Black" "None")
if [ "$bgcol" = "" ];then bgcol="$defaultbgcol";fi
a2hopts=""
if [ "$bgcol" = "White" ];then a2hopts="-w -c";fi
if [ "$bgcol" = "Black" ];then a2hopts="-c";fi
if [ "$bgcol" = "None" ];then a2hopts="-n";fi
rougify highlight -t "$theme" "$1" > "$ansiname"
ansi2html $a2hopts < "$ansiname" > "$htmlname"
"$browser" $browserparms "$browserprefix$htmlname" &
----------- end rougify_convert --------------------------
Requires zenity, rougify from the ruby-rouge package, and
ansi2html from the colorized-logs package. Temp directory is set
to /dev/shm/ which on modern Ubuntu-like distros should be a
user-writable ram disk. If not change /dev/shm/ to /tmp/ or some
other writable directory. Output files are not removed to permit
reusing. The script uses zenity to prompt for the rougify theme
and ansi2html parameters to set the background color, then runs
rougify to produce an ANSI file then uses ansi2html to convert the
ANSI file to HTML. The method it uses to grab the theme list
assumes that the command "rougify help style" outputs a
comma-separated list of themes as the last line, if that changes
the script will have to be modified. Not sure why it added the
bold attribute to the pasted text but that's easy to change in the
Seamonkey Composer editor and I think like the way it looks bolded
better anyway. As with VIMconvert lately both Firefox and
Chrome-based browsers have been making it difficult to copy/paste
into Seamonkey Composer while preserving the colors, so the
browser is set to seamonkey.
mdbrowser - a Markdown File Viewer
1/13/22- Lately lots of source packages have README.md and other
docs in markdown format. Okular can display the text but doesn't
show the in-line graphics, often fetched from an external web
site. At first I found something in the repository called simply
"markdown" that converts markdown text to html including images,
but it didn't properly handle embedded script code. Soon found
"pandoc" (was already installed on my system) which does a much
better job. Both simply read a file and write the equivalent HTML
to standard output. Here's my "mdviewer" script...
---------- begin mdviewer --------------------------------
#!/bin/bash
# mdbrowser file - view a markdown file in a browser - 220113b
# requires the pandoc program and a web browser
if ! [ -f "$1" ];then exit;fi    # exit if file doesn't exist
tempdir="/dev/shm/mdbrowser_tmp" # converted html file left here
mdconvert="pandoc"               # name of markdown-to-html converter
mdconvparms=""                   # extra parms for converter
browser="google-chrome"          # firefox, google-chrome, seamonkey etc
browserparms="--new-window"      # don't open in tab if browser running
browserprefix="file://"          # add to temp name for url
mkdir -p "$tempdir"              # make temp dir if it doesn't exist
tname="$tempdir/$(basename "$1").htm" # form temp html filename
"$mdconvert" $mdconvparms "$1" > "$tname" # convert file to html
"$browser" $browserparms "$browserprefix$tname" &>/dev/null & # view it
---------- end mdviewer ----------------------------------
Temp directory is set to "/dev/shm/mdbrowser_tmp", edit if
needed. Temp HTML file is not removed.
1/18/22 - Found a couple more options for colorizing program
code... "pygmentize" from the python3-pygments package, and
"chroma". Also for converting the ANSI-coded text to HTML the
"aha" converter program works better for scripts that contain UTF8
codes. Here's a script that uses pygmentize and aha...
---------- begin pygmentize_convert -----------------------
#!/bin/bash
# pygmentize_convert 220118
# colorize source using pygmentize from the python3-pygments package
# then convert ANSI to HTML using aha (or ansi2html)
# then view the HTML file using the SeaMonkey browser
tempdir="/dev/shm/pygmentize_convert_tmp" # ansi/html files will be left here
browser="seamonkey"
browserparms="--new-window"
browserprefix="file://"
if ! [ -f "$1" ];then exit;fi # exit if file doesn't exist
mkdir -p "$tempdir"
fname=$(basename "$1")
ansiname="$tempdir/$fname.ansi"
htmlname="$tempdir/$fname.html"
# -f options: terminal terminal16m or terminal256
pygmentize -g -f terminal16m "$1" > "$ansiname"
aha < "$ansiname" > "$htmlname"
#ansi2html -w -c < "$ansiname" > "$htmlname"
"$browser" $browserparms "$browserprefix$htmlname" &
---------- end pygmentize_convert -------------------------
Here's a fancier script that uses chroma with zenity to prompt
for the theme, formatter and converter (ansi2html or aha, white or
black)... [updated 1/21/22]
---------- begin chroma_convert ---------------------------
#!/bin/bash
# chroma_convert 220121
# colorize source to ANSI using chroma
# then convert to HTML using aha or ansi2html from colorized-logs package
# then view the HTML file using the SeaMonkey browser
# uses zenity to prompt for style/formatter/converter, ok for defaults
# uses tr to convert to unix line ends
tempdir="/dev/shm/chroma_convert_tmp" # ansi/html files will be left here
browser="seamonkey"
browserparms="--new-window"
browserprefix="file://"
defaultstyle="pygments" # defaults if nothing selected
defaultformatter="terminal16m"
defaultconverter="ansi2html -w -c"
if ! [ -f "$1" ];then exit;fi # exit if file doesn't exist
set -e # exit if error so zenity cancel works
mkdir -p "$tempdir"
fname=$(basename "$1")
unixname="$tempdir/_$fname" # underscore prefix in case tempdir set to "."
ansiname="$tempdir/$fname.ansi"
htmlname="$tempdir/$fname.html"
# get list of available styles...
stylelist=$(chroma --list|grep "styles: "|tail -c +9)
style=$(zenity --title "chroma_convert" --text "Select style..." \
        --column "" --hide-header --list $stylelist)
if [ "$style" = "" ];then style=$defaultstyle;fi
formatter=$(zenity --title "chroma_convert" --text "Select formatter..." \
        --column "" --hide-header --list terminal terminal16m terminal256)
if [ "$formatter" = "" ];then formatter=$defaultformatter;fi
conv=$(zenity --title "chroma_convert" --text "Select converter..." \
        --column "" --hide-header --list \
        "ansi2html white" "ansi2html black" "aha white" "aha black")
converter=$defaultconverter
if [ "$conv" = "ansi2html white" ];then converter="ansi2html -w -c";fi
if [ "$conv" = "ansi2html black" ];then converter="ansi2html -c";fi
if [ "$conv" = "aha white" ];then converter="aha";fi
if [ "$conv" = "aha black" ];then converter="aha --black";fi
tr -d "\r" < "$1" > "$unixname" # convert file to unix line ends
chroma -l autodetect -s $style -f $formatter "$unixname" > "$ansiname"
$converter < "$ansiname" > "$htmlname"
"$browser" $browserparms "$browserprefix$htmlname" &
---------- end chroma_convert -----------------------------
Both scripts use the SeaMonkey browser to display the output for
easy copy/paste into SeaMonkey Composer, the generated ANSI and
HTML output is left in the temporary directory.
1/21/22 - Noticed that chroma (version 0.7.1 from the 20.04
repository) has issues with dos-formatted line ends, so added a
simple tr command to remove CR characters from a temp copy before
running chroma on it. Also updated the rougify_convert script to
use the set -e trick to exit if zenity's cancel button is clicked
and added default theme and background color for clicking ok
without selecting anything, edit to set the defaults.
1/25/22 - Well here's a wonderful time waster, Rigs of
Rods... (click images for bigger)


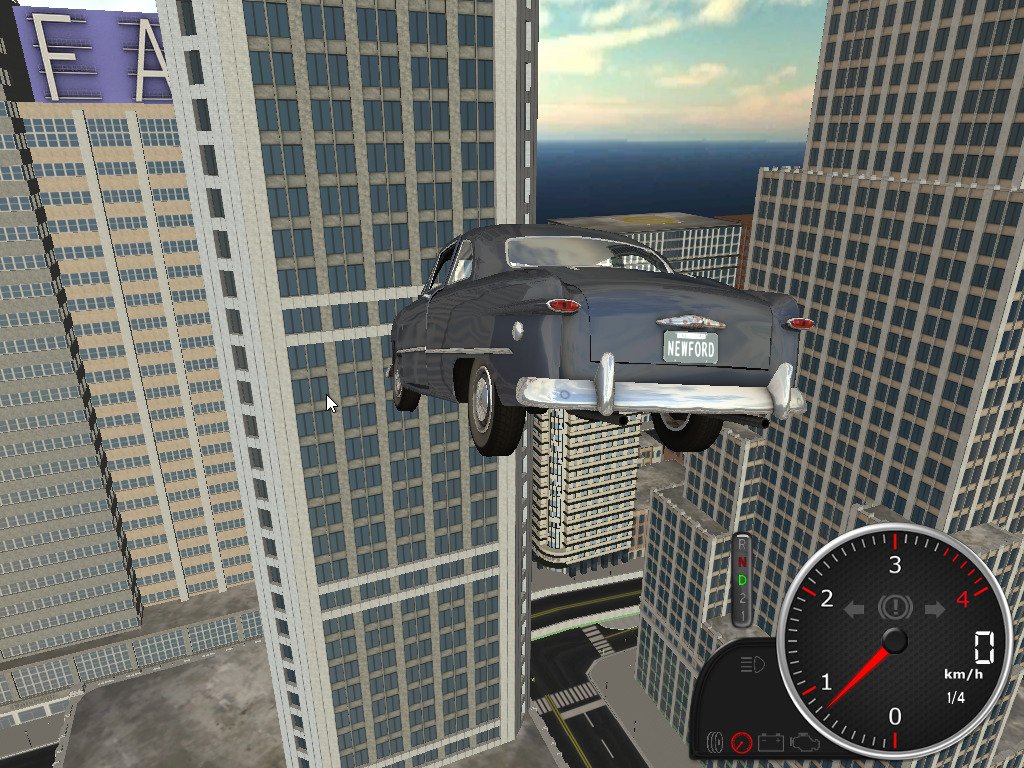
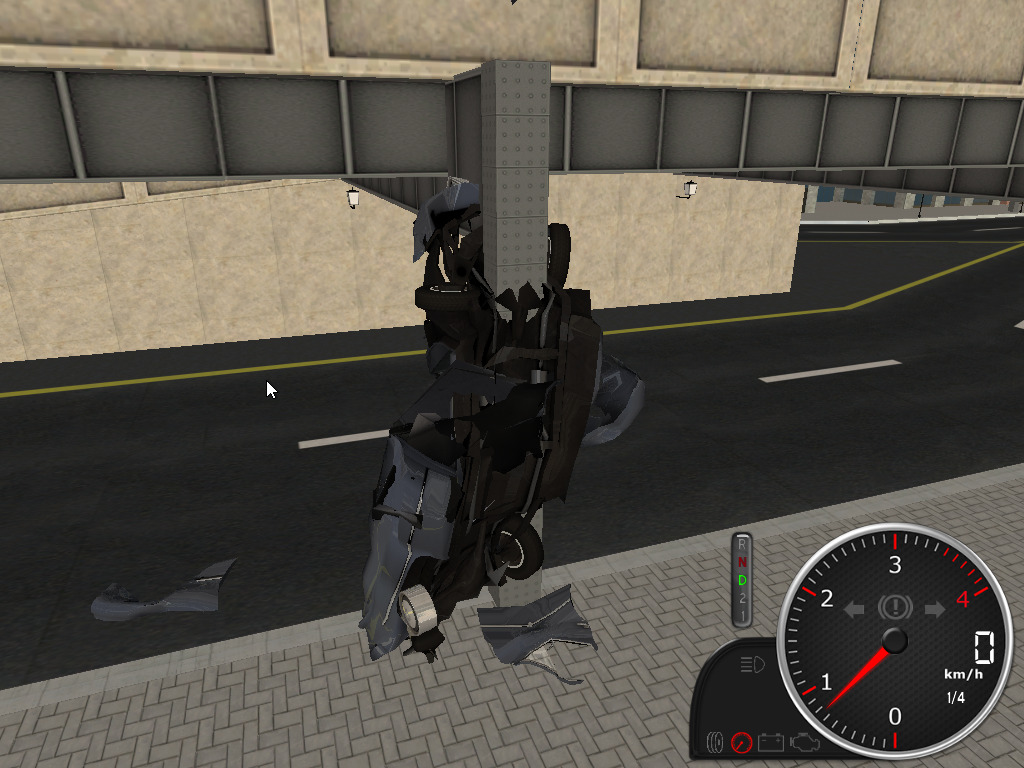
I installed the snap version from the Ubuntu Snap Store. The
install itself doesn't come with a lot of content but a wide
selection of terrains and vehicles are available from the Rigs of Rods
repository, the above screenshots are "Penguinville" with an
easily destroyed 1949 Ford Club Coupe. The default settings were
quite sluggish on my system but disabling light sources and
shadows got it up to speed. Rigs of Rods is more of a physics
simulator than a game, basically you drive around and, uh, wreck
stuff, but it's loads of fun.. can grab the car with the mouse and
give it a fling.. wheee! crunch! The Rigs of Rods' physics engine
is based on deformable rods and vertices, and is similar to the
ideas used in the commercial BeamNG.drive game for Windows.
This article
from the docs explains the physic simulation in more detail.
Cool stuff.
[1/28/22] Apparently Rings of Rods (RoR) and BeamNG both use a
similar (if not the same) reality engine, the glitches shown in
numerous BeamNG videos are basically the same glitches I get in
RoR, specifically sometimes if deformations happen too fast, it
results one or more "glitch rays" extending from the (mangled)
object. Only happens after extreme crashes and doesn't impact
normal game play. The rods and vertices model of reality is very
effective and somewhat models what happens at an atomic level -
atom nucleons contain mass and bonds between the atoms are the
rods, the atom doesn't care what angle the bond makes, that's
determined by other forces (electrostatic etc). From this simple
model emerges all sorts of macro physics. Of course RoR doesn't
simulate this at a microscopic level so it takes shortcuts, stuff
like elastic and static deformation is modeled at the rod level to
permit realistic behavior with a relatively few number of nodes.
To permit simulating vehicles without having to model every shaft
and gear, some objects in RoR have special properties - steering
can be done with special rods that shorten and lengthen, and
wheels can rotate on their own without an engine. This leads to
hilarious behavior, the steering wheel seems to be indestructible
and even the most scrunched up vehicles can still try to move.
These are optional behaviors, RoR can more accurately model the
drive train in trade for more compute power.
1/28/22 - Here's a script that generates an HTML index file for a
directory of certain files...
---------- begin mkhtmindex ----------------------------
#!/bin/bash
# mkhtmindex 220128 - create a crude 0index.htm containing...
# <html><body><h3>Index</h3>
# <li><a href="fname1.html">fname1.html</a> </li>
# <li><a href="fname2.html">fname2.html</a> </li>
# ...etc...
# <br><body></html>
outfile="0index.htm"
matchlist="*.html *.htm *.txt *.jpg *.gif *.png"
temp1="mkhtmindex.tmp1"
temp2="mkhtmindex.tmp2"
echo "Creating $outfile..."
if [ -f "$outfile" ];then rm "$outfile";fi
if [ -f "$temp2" ];then rm "$temp2";fi
echo "<html><body><h3>Index</h3>" > "$temp1"
for file in $matchlist ;do
 echo "<li><a href=\"$file\">$file</a> </li>" >> "$temp2"
done
sort -fg < "$temp2" | grep -v "\*." >>"$temp1"
echo "<br><body></html>" >> "$temp1"
rm "$temp2"
mv "$temp1" "$outfile"
echo "Done."
---------- end mkhtmindex ------------------------------
Useful for indexing a bunch of saved documentation pages, adjust
the matchlist variable as needed.
2/1/22 - Here's a recursive version, also indexes PDF files too
by default...
---------- begin mkrhtmindex ---------------------------
#!/bin/bash
# mkrhtmindex 220201 - create a crude 0index.htm containing...
# <html><body><h3>Index</h3>
# <li><a href="fname1.html">fname1.html</a> </li>
# <li><a href="fname2.html">fname2.html</a> </li>
# ...etc...
# <br><body></html>
# recursive version using find, usage...
# mkrhtmindex [maxdepth ["matchlist"]] where maxdepth is an
# integer and "matchlist" is a quoted extended regex string
# For example: mkrhtmindex 2 ".htm$|.html$|.txt$"
# creates index of .htm .html and .txt files in current dir
# and one subdirectory below the current dir
outfile="0index.htm"
matchlist=".html$|.htm$|.txt$|.jpg$|.gif$|.png$|.pdf$"
maxdepth=5 # default maximum recursion depth
temp1="mkhtmindex.tmp1"
temp2="mkhtmindex.tmp2"
if [ "$1" != "" ];then maxdepth=$1;fi
if [ "$2" != "" ];then matchlist=$2;fi
echo "Creating $outfile..."
if [ -f "$outfile" ];then rm "$outfile";fi
echo "<html><body><h3>Index</h3>" > "$temp1"
# do the current directory first...
find -L . -maxdepth 1 -type f -readable | grep -E \
  "$matchlist" | sort -g | sed "s/.\///" > "$temp2"
# now add subdirectories...
find -L . -maxdepth "$maxdepth" -type f -readable | grep -E \
  "$matchlist" | sort -g | sed "s/.\///" | grep "/" >> "$temp2"
while read -r file;do
 echo "<li><a href=\"$file\">$file</a> </li>" >> "$temp1"
done < "$temp2"
echo "<br><body></html>" >> "$temp1"
rm "$temp2"
mv "$temp1" "$outfile"
echo "Done."
---------- end mkrhtmindex -----------------------------
This version takes optional parameters for recursion depth and
grep regex match string (which must be quoted), in the match
string "$" means end of line (otherwise would match the string
anywhere in the name) and "|" separates the search terms. If no
parms supplied then uses what's defined by the maxdepth and
matchlist variables. The sed "s/.\///" commands strip the leading
"./" characters from the filenames returned by find.
Different Themes for Different Apps
2/10/22 - I usually use a slightly modified Adwaita Dark theme but recently I installed the Pan newsreader and it absolutely hates dark themes. What to do... turns out the solution is very simple - the environment variable setting GTK_THEME="ThemeName" overrides the theme for GTK3 apps, and the environment variable setting GTK2_RC_FILES="/usr/share/themes/ThemeName/gtk-2.0/gtkrc" overrides the theme for GTK2 apps. The env command (besides listing environment variables) permits setting an environment variable then running an app with the variable setting in effect.
For example, to run the Pan app using the Adwaita theme, edit the
launcher command line and change...
pan %U
...to...
env GTK_THEME="Adwaita" pan %U
What to edit depends on the desktop environment, for MATE or
Flashback the "Main Menu" applet can be used. For apps that are
run by association it's useful to add a script to ~/.local/bin
with the same name as the app binary containing (for example)...
#!/bin/bash
env GTK_THEME="Adwaita" /usr/bin/appbinary "$@"
...then for most Ubuntu-like systems the script will run first so
it can set the variable then run the app from its installed path.
A similar technique can be used for GTK2 apps using the
GTK2_RC_FILES variable, but it must be set to the full path to the
theme's gtkrc file.
Here's a script that lists installed GTK2 and GTK themes...
---------- begin listthemes --------------------------------
#!/bin/bash
# listthemes 220210 - lists installed themes
# if not in a terminal then relaunches itself in an xterm window
# list themes in /usr/share/themes and ~/.themes, for each directory...
# print "directoryname -"
# print "GTK2" if gtk-2.0/gtkrc exists
# print "GTK3" if gtk-3.0/gtk.css exists
# if theme.index exists then...
# print GtkTheme= entry (G=entry)
# print MetacityTheme= entry (M=entry)
# print IconTheme= entry (I=entry)
# print Comment= entry (D=entry, D= suppressed if color)
# uses sed to add color ANSI codes to print line
if ! [ -t 0 ];then  # if not already in a terminal
 if [ "$1" != "xt" ];then # if 1st parm not xterm (in case -t fails)
  xterm -geometry 130x40 -e "$0" xt # launch in a xterm window
 fi
 exit
fi
color=1 # make 1 for color output, 0 for monochrome
width=$(tput cols) # get terminal width
if [ "$width" = "" ];then width=80;fi # in case that didn't work
for d in "(-ist-)" /usr/share/themes/* "(-umt-)" ~/.themes/*;do
 if [ "$d" = "(-ist-)" ];then echo "(installed system themes)";fi
 if [ "$d" = "(-umt-)" ];then echo "(user modified themes)";fi
 if [ -d "$d" ];then # if a directory...
  line=""
  if [ -f "$d/gtk-2.0/gtkrc" ];then line=" GTK2";fi
  if [ -f "$d/gtk-3.0/gtk.css" ];then line="$line GTK3";fi
  if [ -f "$d/index.theme" ];then
   e=$(grep "GtkTheme=" "$d/index.theme"|head -n1|tail -c+10)
   if [ "$e" != "" ];then line="$line G=$e";fi
   e=$(grep "MetacityTheme=" "$d/index.theme"|head -n1|tail -c+15)
   if [ "$e" != "" ];then line="$line M=$e";fi
   e=$(grep "IconTheme=" "$d/index.theme"|head -n1|tail -c+11)
   if [ "$e" != "" ];then line="$line I=$e";fi
   e=$(grep "CursorTheme=" "$d/index.theme"|head -n1|tail -c+13)
   if [ "$e" != "" ];then line="$line C=$e";fi
   e=$(grep "Comment=" "$d/index.theme"|head -n1|tail -c+9)
   if [ "$e" != "" ];then line="$line D=$e";fi
  fi
  if [ "$line" != "" ];then
   line="$(basename "$d") -$line"
   line="$(echo -n "$line"|head -c "$width")"
   if [ "$color" = "1" ];then # use sed to colorize line...
    line="\033[0;32m$line\033[0m"
    line=$(echo -n "$line"|sed "s/ - /\\\033[0m - /")
    line=$(echo -n "$line"|sed "s/ GTK2/\\\033[1;33m GTK2/")
    line=$(echo -n "$line"|sed "s/ GTK3/\\\033[1;34m GTK3/")
    line=$(echo -n "$line"|sed "s/ G=/\\\033[0;36m G=/")
    line=$(echo -n "$line"|sed "s/ M=/\\\033[0;33m M=/")
    line=$(echo -n "$line"|sed "s/ I=/\\\033[0;35m I=/")
    line=$(echo -n "$line"|sed "s/ C=/\\\033[0;32m C=/")
    line=$(echo -n "$line"|sed "s/ D=/\\\033[0;31m   /")
   fi
   echo -e "$line"
  fi
 fi
done
if [ "$1" = "xt" ];then # was launched in an xterm window
 echo -n "------- press a key to close -------"
 read -rn 1
fi
---------- end listthemes ----------------------------------
A few tricks in this script.. trying a new way to launch itself
in xterm if not already running in a terminal, the first ! [ -t 0
] test triggers if not already running in a terminal but still
don't fully trust that to be 100% reliable so to make sure and
avoid a potential infinite loop it also checks for the "xt"
parameter added to the xterm run self command, also used to
trigger the "press a key" prompt. The terminal width is determined
using $(tput cols), there's also a $COLUMNS variable but it's
mostly useless because if the terminal is resized anything then
run from the resized terminal won't see the change. If for some
reason $(tput cols) returns no output (like tput isn't installed)
then defaults to 80 columns. A for/do/done loop is used to iterate
over all the theme directories, the tags (-ist-) and (-umt-) are
used to trigger printing "(installed system themes)" and "(user
modified themes)". Probably don't need the if [ -d "$d ] check but
whatever. The line is built up item by item depending on what it
finds.. GTK2 GTK3 and entries in the index.theme file if it
exists, tagging the entries G=gtktheme M=metacity theme
I=icontheme C=cursortheme and D=comment/description, this line is
then trimmed to the terminal width to avoid wrapping. If color is
enabled, then sed is used to replace the tagged line entries with
colorized versions without changing the visible line length. Not a
perfect scheme, can be fooled, but works well enough for something
like this.
Output on my system looks like this...

...probably could ditch a lot of those, left over from setting up
my system in search of the perfect look. These days pretty much
just use the Adwaita themes system-wide since that's what most
GTK3 apps expect, but now I can use some of the other themes for
certain apps.
2/14/21 - I don't have many GTK2 apps left but one that I use all
the time is gFTP, and it's not so good with my default dark system
theme...
Would have been OK except for the terminal text color. Here it is
using the Shiki-Brave GTK2 theme from the shiki-brave-theme
package...
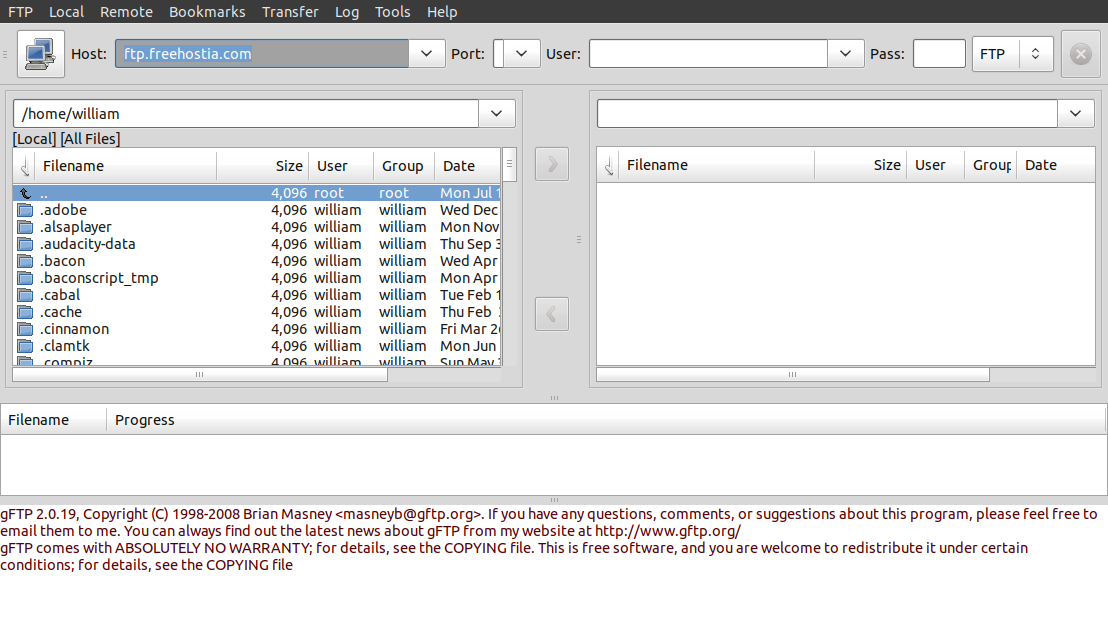
Much better! To get this I used the Main Menu applet to edit the
gFTP menu entry to use the command line...
env GTK2_RC_FILES="/usr/share/themes/Shiki-Brave/gtk-2.0/gtkrc" gftp-gtk %u
Curiously pretty much all of the GTK3 themes that also had GTK2
directories (Adwaita Ambiance etc) produced horrible results,
mixed elements from my default dark system theme and the specified
GTK2 theme producing an upchuck of yuck. GTK2-only themes tended
to work better but it was still hit and miss finding a nice
looking theme.
BTW the %u %U etc codes sometimes seen in desktop files after the
command line are for drag-n-drop support, %f for a single file, %F
for a file list, %u for a single url or file, and %U for a list of
urls or files. Equivalent to "$1" or "$@" in scripts.
XTLIST with colorized xxd output
and other sed ANSI tricks
2/21/22 - Here's a new version of my xtlist file lister script
(previous versions here and here)
modified to colorize the hex dump and to tweak the source
highlight output to avoid dark colors (among things)...
------------- begin xtlist ----------------------------------This version adds commented settings for using the pygmentize or chroma highlighters (but I still usually use rougify), but one main change is to the xxd output when listing binary code when color is enabled...
#!/bin/bash # # xtlist - list a text, source or binary file in a xterm window - 220221 # usage: xtlist "filename" # To use this script as written requires the following... # xterm, xxd, sed, libtree from https://github.com/haampie/libtree # (edit below to use lddtree from the pax-utils package instead), # unbuffer from the expect package, rougify from the ruby-rouge package, # and pygmentize from the python3-pygments package. Optional utilities # that don't exist are eliminated or replaced with something else. # # Uses xxd for displaying binary files, set hexbyte to bytes per line # If encolor=1 then uses sed to colorize xxd output # As written uses rougify from the ruby-rouge package to colorize source # code, can also use source-highlight, pygmentize or chroma # If fixcolors=1 then uses sed to brighten dim color codes # As written pygmentize is used to highlight autodetected BASIC code # Make enbas=0 to disable BASIC-specific overrides # Change encolor=1 to encolor=0 to disable color and use plain cat # As written uses libtree for displaying binary dependencies (link below) # and uses unbuffer from expect package to trick libtree into color output # Uses less for display, main controls are up/down arrow, page up/down, # home for beginning, end for end, q to quit (or close xterm window) # As written enables mouse scrolling but that disables copy/paste # Less has a number of features, press h for help # cols=90 # xterm columns (expands as needed for binary hex dump) rows=50 # xterm rows encolor=1 # 1 for colorized output, 0 to disable color fixcolors=1 # 1 to fix dim colors (if color enabled) xtermfgcol="-fg green" # xterm forground color, "" for default xtermbgcol="-bg black" # xterm background color, "" for default xtermfont="" # extra xterm parameters #xtermfont="-fn 10x20" # xterm font, "" for default (xlsfonts for list) #xtermfont="-fn 9x15" xtermfont="-fn 7x14" hexbytes=32 # xxd hexdump bytes per line (must be even) textgrep=" text| empty" # file output to determine if a text file exegrep=" ELF" # file output to determine if an ELF binary # default utilities lddutil="" # optional, utility to list ELF dependencies ptyutil="" # optional, utility to fake terminal operation viewm="cat" # required, default utility for streaming monochrome text viewc="cat" # required, default utility for streaming color text lessutil="less" # ----- edit/comment these to specify/disable utilities --------------- #lessutil="less -R -~" # viewer utility and options lessutil="less -R --mouse -~" # less with mouse scroll (disables copy/paste) # syntax-highlighting viewer for color... viewc="rougify highlight -t igorpro" # rougify from ruby-rouge #viewc="source-highlight --failsafe -f esc -i" # GNU source-highlight #viewc="pygmentize -g -f terminal256" # pigmentize from python3-pygments #viewc="pygmentize -g -f terminal256 -O style=paraiso-dark" # with theme #viewc="chroma -l autodetect -s paraiso-dark -f terminal256" # viewer for .bas files... enbas=1 # 1 to enable BASIC specific overrides, 0 for highlighter default viewbas="rougify -t igorpro -l bbcbasic" #viewbas="pygmentize -l basic -f terminal256 -O style=paraiso-dark" # viewer for auto-detected BASIC code (not in a .bas file)... #viewadbas="rougify -t igorpro -l bbcbasic" viewadbas="pygmentize -l basic -f terminal256 -O style=paraiso-dark" # viewer for lower-case scripted basic code... viewscrbas="rougify -t igorpro -l realbasic" # closest w/lowercase support # utility for listing dependencies... #lddutil="lddtree -a" # lddtree from the pax-utils package lddutil="libtree -ap" # libtree from https://github.com/haampie/libtree # command to trick libtree into thinking it's running in a terminal... ptyutil="unbuffer" # unbuffer from the expect package #ptyutil="pty" # pty from https://unix.stackexchange.com/questions/249723/ # ----- end utility edits ----------------------------- function NotExists # helper for determining if utilities exist { if which "$1">/dev/null;then return 1;else return 0;fi } if [ "$2" = "doit" ];then export LESSSECURE=1 # disable less shell edits etc viewutil=$viewm # adjust for color or mono operation if [ "$encolor" = "1" ];then viewutil=$viewc;else ptyutil="";fi # make sure utilities exist, silently adjust if not if [ "$lddutil" != "" ];then if NotExists $lddutil;then lddutil="";fi;fi if [ "$ptyutil" != "" ];then if NotExists $ptyutil;then ptyutil="";fi;fi if NotExists $lessutil;then lessutil="less";ptyutil="";encolor=0;viewutil=$viewm;fi if NotExists $viewutil;then viewutil="cat";fi if [ "$encolor$enbas" = "11" ];then if NotExists $viewbas;then viewbas=$viewutil;fi if NotExists $viewadbas;then viewadbas=$viewutil;fi if NotExists $viewscrbas;then viewscrbas=$viewutil;fi fi file -L "$1" | if grep -Eq "$textgrep";then ( if [ "$encolor" = "1" ];then echo -ne "\033[1;33m";fi echo -n "ls: ";ls -la "$1" if [ "$encolor" = "1" ];then echo -ne "\033[36m";fi file -L "$1" | if grep ",";then # display type if not plaintext # special case for misidentified BASIC source code file -L "$1" | if grep -q " source,";then head -100 "$1" | if grep -Eqi "^rem |^print \"";then echo "(looks like BASIC)" fi fi fi echo if [ "$encolor" = "1" ];then echo -ne "\033[0m" if (echo "$viewutil"|grep -q "rougify");then # if using rougify... rtype=$(rougify guess "$1") # get what type file it thinks it is if (echo "$rtype" | grep -q "plaintext"); then # if plain text viewutil=$viewm # use monochrome viewer fi # if rougify guess returns nothing at all... if [ "$rtype" == "" ];then viewutil=$viewm;fi # use monochrome if (head -n 1 "$1"|grep -q "^\#\!\/bin\/");then # if 1st line #!/bin/ if (head -n 1 "$1"|grep -Eq "\/bash|\/sh");then # and /bash or /sh viewutil="rougify -t igorpro -l shell" # force shell lexor fi fi fi # end rougify-specific tweaks if [ "$enbas" = "1" ];then # BASIC-specific overrides if (echo "$1"|grep -iq "\.bas$");then # if .bas or .BAS extension viewutil=$viewbas # viewer for .bas files else # autodetect old style basic without .bas extension # this is separate because some highlighters can't handle HP BASIC firstline=$(head -n 1 "$1"|grep -E "^ {,4}[0-9]{1,5} {1,4}[A-Z]") if (echo "$firstline"|grep -Eq \ " REM| PRINT| LET| IF| DIM| INPUT| READ| FOR| GOTO| GOSUB");then if ! ( # first line looks like basic, make sure... head -n 20 "$1"|while IFS= read -r line;do # check 20 lines if (echo "$line"|grep -vEq "^ {,4}[0-9]{1,5} {1,4}[A-Z]");then echo "nope" # signal out of the subshell if not numbered fi done | grep -q "nope");then viewutil=$viewadbas fi fi fi # end .bas file if (head -n 1 "$1"|grep -q "^\#\!\/");then # if #!/ on 1st line # basic scripting languages I use.. if (head -n 1 "$1"|grep -Eq "fbc|bbc|yabasic|blassic|bacon");then viewutil=$viewscrbas # viewer for lowercase basic fi fi fi # end BASIC specific overrides fi # end encolor highlighter stuff $viewutil "$1" || # if error use monochrome streamer... (echo "Error, listing normally...";echo;$viewm "$1") ) | \ ( if [ "$encolor$fixcolors" = "11" ];then # if enabled... # this only works with 256 colors (terminal256) # change esc[38;5;233-239m to esc[38;5;104m (gray to lighter tinted gray) # change esc[38;5;17-21m to esc[38;5;33m (darker blue to lighter blue) # change esc[38;5;0,16,232m to esc[38;5;231m (black to light gray) sed "s/\x1B\[38;5;23[3-9]m/\x1B\[38;5;104m/g" \ | sed "s/\x1B\[38;5;\(1[7-9]\|2[0-1]\)m/\x1B\[38;5;33m/g" \ | sed "s/\x1B\[38;5;\(0\|16\|232\)m/\x1B\[38;5;231m/g" else cat ; fi # otherwise pass straight through ) | $lessutil else # list binary file.. display output of file command, if ELF file # also display ldd and readelf output, then list the file as a hex dump ( if [ "$encolor" = "1" ];then echo -ne "\033[1;32m";fi echo -n "ls: ";ls -la "$1" if [ "$encolor" = "1" ];then echo -ne "\033[36m";fi file -L "$1";file -L "$1" | if grep -Eq "$exegrep";then if [ "$lddutil" != "" ];then echo; if [ $encolor = 1 ];then echo -ne "\033[33m";fi echo "$lddutil output...";echo; $ptyutil $lddutil "$1" fi echo; if [ "$encolor" = "1" ];then echo -ne "\033[33m";fi echo "readelf -ed output...";echo; readelf -ed "$1" fi echo; if [ "$encolor" = "1" ];then echo -ne "\033[33m";fi echo "hex listing...";echo if [ "$encolor" = "1" ]; then # colorize xxd output... xxd -c $hexbytes "$1" | while IFS= read -r line; do # read each line line=${line//\\/\\\\} # escape backslashes to avoid misinterpreting line="\033[32m$line\033[0m" # address color, reset color at end of line line=$(echo "$line"|sed "s/: /: \\\033[36m/") # add hex color line=$(echo "$line"|sed "s/ / \\\033[31m/") # add ascii color echo -e "$line" # write modified line, convert \033 codes to binary done else xxd -c $hexbytes "$1" fi ) | $lessutil fi else if [ -f "$1" ]; then if ! (file -L "$1"|grep -Eq "$textgrep");then # if not a text file xddcols=$((hexbytes*5/2+hexbytes+11)) # calc hex dump columns if [ $cols -lt $xddcols ];then cols=$xddcols;fi # expand as needed fi xterm -title "xtlist - $1" -geometry "$cols"x"$rows" \ $xtermfgcol $xtermbgcol $xtermfont -e "$0" "$1" doit & fi fi
------------- end xtlist ------------------------------------
     # colorize xxd output...
     xxd -c $hexbytes "$1" | while IFS= read -r line; do # read each line
      line=${line//\\/\\\\}  # escape backslashes to avoid misinterpreting
      line="\033[32m$line\033[0m" # address color, reset color at end of line
      line=$(echo "$line"|sed "s/: /: \\\033[36m/") # add hex color
      line=$(echo "$line"|sed "s/  /  \\\033[31m/") # add ascii color
      echo -e "$line" # write modified line, convert \033 codes to binary
     done
$hexbytes is set to the number of columns and "$1" is the
filename. First it pipes the xxd output into a while read loop
(with -r so it doesn't interpret backslashes, the IFS= ensures
that whitespace isn't trimmed but that doesn't matter in this
case) setting the line variable to each line, one line at a time.
For each line it first uses sed to convert all "\" characters to
"\\" so that echo -e won't mangle them, then it puts a green ANSI
code at the beginning of the line and a color reset code at the
end of the line, then replaces the first ": " with ": " plus a
cyan color code, then replaces the first double space with a
double space plus a red color code, then echos the line with -e to
preserve the color output. This all gets piped into less -R.
The results look like...
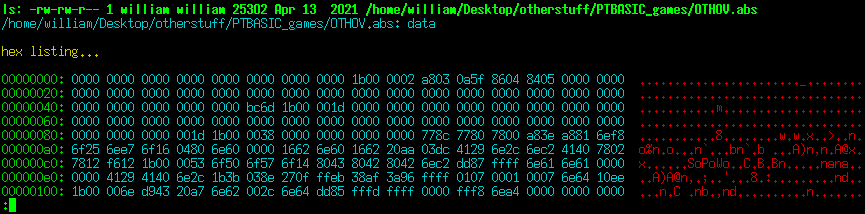
Just a little thing but it does make it easier to parse. Note
that there is no real processing delay from doing this, the
pipeline still processes one line at a time as needed so even if
passing a multi-gigabyte file the hex listing appears almost
instantly.
Another change is when listing colorized source code it edits the ANSI codes on the fly to avoid darker colors, this is implemented as an extra (code) block inserted between the highlighter code block and less...
  (
    ...highlight lister code...
  ) | \
  ( if [ "$encolor$fixcolors" = "11" ];then # if enabled...
     # this only works with 256 colors (terminal256)
     # change esc[38;5;233-239m to esc[38;5;104m (gray to lighter tinted gray)
     # change esc[38;5;17-21m to esc[38;5;33m (darker blue to lighter blue)
     # change esc[38;5;0,16,232m to esc[38;5;231m (black to light gray)
       sed "s/\x1B\[38;5;23[3-9]m/\x1B\[38;5;104m/g" \
     | sed "s/\x1B\[38;5;\(1[7-9]\|2[0-1]\)m/\x1B\[38;5;33m/g" \
     | sed "s/\x1B\[38;5;\(0\|16\|232\)m/\x1B\[38;5;231m/g"
    else cat ; fi # otherwise pass straight through
  ) | $lessutil
Since it was all straight(ish) replacements implemented as a
sequential sed pipeline rather than a while read loop, if the fix
isn't enabled then passes the text through cat instead. The regex
code was a bit tricky but slowly starting to get it.. '\x1B'
matches the binary escape chars, '\[' matches '[', '23[3-9]'
matches 233 through 239, 1[7-9] matches 17 through 19 and '2[0-1]'
matches 20-21, so '\(1[7-9]\|2[0-1]\)' matches 17 through 21 (the
'(' '|' and ')' have to be backslash-escaped), and
'\(0\|16\|232\)' matches 0, 16 or 32. I used this handy 8-bit
ANSI color code chart to figure out what to change, from
this ANSI
Escape Codes guide.
Here is the stock rougify highlight -t igorpro output...
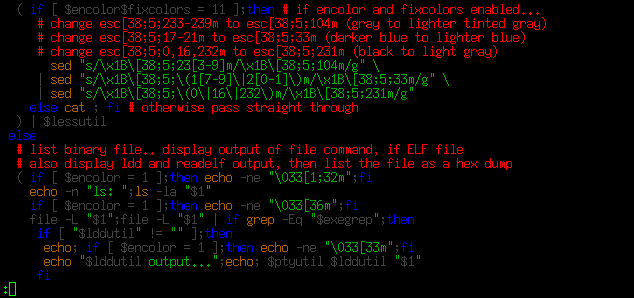
...and with fixcolors enabled...
...I can read that better. As with the xxd colorizing code, the
extra processing adds no real overhead - large source files still
appear almost instantly, although (as with VIM) sometimes the
highlighting is hit or miss. Pygmentize seems to do better with
tricky code.
Another change to the xtlist script is separating the .BAS file
and basic scripts detection so I can use rougify and/or pygmentize
for BASIC code even when using another highlighter for other
source code, now the rougify-specific section just includes
workarounds for plain text and to force the shell lexor for
/bin/sh and /bin/bash - was getting confused by the <html>
in the mkhtmindex script's comments. There's a lot of
BASIC-specific overrides in this script (I use various BASICs a
lot) - if the file extension is .BAS (any case) then it uses
whatever viewbas is set to for the highligher utility. If the
extension is not .BAS then it checks to see if it looks like
old-style BASIC code (uppercase with line numbers), if so then
uses the viewadbas setting. This is separate from the .BAS
detection because pygmentize does a better job with old HP BASIC
source (uses [n] for arrays) which I usually save with a .TXT
extension since QBasic BBCBASIC etc will barf on it. Finally, I
write a lot of scripts using scripted basic (blassic,
yabasic
and my homemade solutions fbcscript, baconscript
and bbcscript), these are
detected if the file starts with #!/ plus a key string and use the
viewscrbas setting. All of this BASIC specific stuff can be
disabled by making enbas=0.
The script is starting to get a bunch of dependencies so added
code to verify that the utilities exist, if any of the optional
utilities don't exist (xterm xxd and sed assumed to exist) then
tries to fall back to something that'll at least work. If the main
highligher viewc doesn't exist then uses cat, if the BASIC
specific highlighters don't exist then falls back to the main
highlighter, and if lddutil or ptyutil doesn't exist then disables
those. The script triggers a few shellcheck warnings but these are
intentional - in several places a $variable is not quoted to force
expansion to separate parameters, and var=${var//search/replace}
doesn't (as far as I can tell) do what I need to do.
Controlling the CPU speed, take 2
3/21/22 - The previous version of my CPUgov script uses the cpufreq-set utility to select one of four CPU speed governors - performance, ondemand, conservative, or powersave. Like most computers these days it seems, the cooling fan in my system can't support full CPU utilization continuously, and the AMD Ryzen 3600 in my system doesn't gracefully throttle, the whole thing just shuts off if it gets too hot (ouch). So typically I use the powersave governor and have a script that periodically checks the temperature, forcing powersave if things get too hot. Recently I discovered that I could bump up the powersave frequency from 2.2Ghz to 2.8Ghz and the system was still fine thermally even with 100% processor usage, so redid my CPUgov script to allow selecting additional fixed clock rates...
--------------- begin CPUgov ---------------------------
#!/bin/bash
# CPUgov - set all CPU's to specified governor - 220321
# requires Zenity and the cpufrequtils package, and CPU/kernel
# support for frequency control. For governor descriptions see...
# https://www.kernel.org/doc/Documentation/cpu-freq/governors.txt
# The cpufreq-set binary must be made root suid, i.e..
#  sudo chmod u+s /usr/bin/cpufreq-set
# ..otherwise this script has to run as root.
cpudev="/sys/devices/system/cpu"
maxcpu=31 # max cpu scanned, non-existent cpus ignored
# bail if the CPU doesn't have adjustable frequencies...
if ! [ -e $cpudev/cpu0/cpufreq/scaling_available_frequencies ];then exit;fi
function GetFreqs # helper to get last three available frequencies
{ freq1=$1;freq2="";freq3="" # return freq1 freq2 freq3 in ascending order
  if [ "$2" != "" ];then freq1=$2;freq2=$1;freq3="";fi # empty if not avail
  while [ "$3" != "" ];do freq1=$3;freq2=$2;freq3=$1;shift;done }
GetFreqs $(cat $cpudev/cpu0/cpufreq/scaling_available_frequencies)
sel2="";if [ "$freq2" != "" ];then sel2="Fixed clock 2 ($freq2 Khz)";fi
sel3="";if [ "$freq3" != "" ];then sel3="Fixed clock 3 ($freq3 Khz)";fi
selection=$(zenity --title "CPU Governor" --hide-header \
 --column "" --width 330 --height 230 --list \
 "Performance (maximum clock rate)" \
 "On Demand (quickly adjust for load)" \
 "Conservative (slowly adjust for load)" \
 "Power Save (fixed clock $freq1 Khz)" \
 "$sel2" "$sel3"
 )
gov="";minfreq=$freq1
if [ "${selection:12:1}" = "2" ];then minfreq=$freq2;fi
if [ "${selection:12:1}" = "3" ];then minfreq=$freq3;fi
if [ "${selection:0:3}" = "Per" ];then gov=performance;fi
if [ "${selection:0:3}" = "On " ];then gov=ondemand;fi
if [ "${selection:0:3}" = "Con" ];then gov=conservative;fi
if [ "${selection:0:3}" = "Pow" ];then gov=powersave;fi
if [ "${selection:0:3}" = "Fix" ];then gov=powersave;fi
if [ "$gov" != "" ];then
 for cpu in $(seq 0 1 $maxcpu);do
  if [ -e "$cpudev/cpu$cpu" ];then
   cpufreq-set -c $cpu -g $gov -d $minfreq
  fi
 done
fi
--------------- end CPUgov -----------------------------
Here's how it looks on my system...
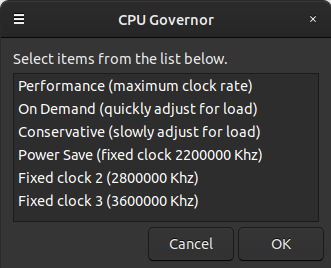
It lists the last 3 entries from the
scaling_available_frequencies file (which for my system is all of
them) with the lowest one being Power Save, the other options also
use the powersave governor but bump up the scaling_min_freq
variable. If there are less than 3 available frequencies it lists
what's available, the blank options are selectable but do nothing.
Like the previous CPUgov this script uses the cpufreq-set utility
from the cpufrequtils package, to avoid having to have root
permissions, prompt for the password etc the cpufreq-set binary is
set to root suid using the chmod command listed in the comments.
Here is a version of the script that does not use the cpufreq-set
utility....
--------------- begin CPUgov2 --------------------------
#!/bin/bash
# CPUgov2 - set all CPU's to specified governor - 220321
# requires Zenity and CPU/kernel support for frequency control.
# For governor descriptions see...
# https://www.kernel.org/doc/Documentation/cpu-freq/governors.txt
#
cpudev="/sys/devices/system/cpu"
maxcpu=31 # max cpu scanned, non-existent cpus ignored
pw="" # put something here to avoid prompting for the sudo password
# bail if the CPU doesn't have adjustable frequencies...
if ! [ -e $cpudev/cpu0/cpufreq/scaling_available_frequencies ];then exit;fi
function GetFreqs # helper to get last three available frequencies
{ freq1=$1;freq2="";freq3="" # return freq1 freq2 freq3 in ascending order
  if [ "$2" != "" ];then freq1=$2;freq2=$1;freq3="";fi # empty if not avail
  while [ "$3" != "" ];do freq1=$3;freq2=$2;freq3=$1;shift;done }
GetFreqs $(cat $cpudev/cpu0/cpufreq/scaling_available_frequencies)
sel2="";if [ "$freq2" != "" ];then sel2="Fixed clock 2 ($freq2 Khz)";fi
sel3="";if [ "$freq3" != "" ];then sel3="Fixed clock 3 ($freq3 Khz)";fi
selection=$(zenity --title "CPU Governor" --hide-header \
 --column "" --width 330 --height 230 --list \
 "Performance (maximum clock rate)" \
 "On Demand (quickly adjust for load)" \
 "Conservative (slowly adjust for load)" \
 "Power Save (fixed clock $freq1 Khz)" \
 "$sel2" "$sel3"
 )
if [ "$pw" = "" ];then
 pw=$(zenity --title "CPU Governor" --password)
fi
gov="";minfreq=$freq1
if [ "${selection:12:1}" = "2" ];then minfreq=$freq2;fi
if [ "${selection:12:1}" = "3" ];then minfreq=$freq3;fi
if [ "${selection:0:3}" = "Per" ];then gov=performance;fi
if [ "${selection:0:3}" = "On " ];then gov=ondemand;fi
if [ "${selection:0:3}" = "Con" ];then gov=conservative;fi
if [ "${selection:0:3}" = "Pow" ];then gov=powersave;fi
if [ "${selection:0:3}" = "Fix" ];then gov=powersave;fi
if [ "$gov" != "" ];then
 for cpu in $(seq 0 1 $maxcpu);do
  if [ -e "$cpudev/cpu$cpu" ];then
   echo -E "$pw"|sudo -S -p "" bash -c \
   "echo $minfreq > $cpudev/cpu$cpu/cpufreq/scaling_min_freq; \
    echo $gov > $cpudev/cpu$cpu/cpufreq/scaling_governor"
  fi
 done
fi
--------------- end CPUgov2 ----------------------------
This version prompts for the sudo password, to avoid the prompt
the password can be hard-coded where indicated. Usually that is
considered bad security practice but for a personal system it
doesn't matter that much - if a malicious app/user has access to
your home directory you have bigger problems.
Here are the other CPU speed scripts I use, both are run at startup and require the cpufreq-set utility with root suid permissions. These scripts are specific to my system and will require adjustments to use, at least for the maxcpu and freq variables. The maxcpu variable is set to the highest core number. Use the command cat /sys/devices/system/cpu/cpu0/cpufreq/scaling_available_frequencies to list the available frequencies.
This script selects the powersave governor with the minimum
frequency...
--------------- begin CPUpowersave ---------------------
#!/bin/bash
# set all cpu cores to powersave mode
# requires cpufreq-set from cpufrequtils set with chmod u+s
maxcpu=11
gov=powersave
freq=2200000
for cpu in $(seq 0 1 $maxcpu);do
 cpufreq-set -c $cpu -g $gov -d $freq
done
--------------- end CPUpowersave -----------------------
This script periodically checks the temperature and if too hot
engages the powersave governor with the minimum frequency...
--------------- begin autotempthrottle -----------------
#!/bin/bash
# autotempthrottle 220321
# automatically throttle CPU to powersave if temp exceeds threshold
# doesn't throttle up, use CPUgov script to throttle back up after triggering
# requires cpufreq-set from cpufrequtils set with chmod u+s
# requires sensors to read temperature
set -e # exit script if an error occurs
threshtemp=190   # degrees F to trigger throttle
sensorid="Tdie:" # sensor to read
maxcpu=11        # number of cores to throttle
gov=powersave    # governer name
freq=2200000     # frequency to throttle to
sleeptime=10     # time to sleep between checks
while true;do    # loop forever
 sleep $sleeptime
 dietemp=$(sensors -f|grep "$sensorid"|awk '{print $2}'|head -c-6|tail -c+2)
 if [ $dietemp -ge $threshtemp ];then
  # wait some more in case momentary
  sleep $sleeptime
  dietemp=$(sensors -f|grep "$sensorid"|awk '{print $2}'|head -c-6|tail -c+2)
  if [ $dietemp -ge $threshtemp ];then
   # echo "Throttling back"
   for cpu in $(seq 0 1 $maxcpu);do
    cpufreq-set -c $cpu -g $gov -d $freq
   done
  fi
 fi
done
--------------- end autotempthrottle -------------------
This script checks the temperature and the speed of the CPU cores
to make sure everything is working right... (updated)
--------------- begin CPUmon ---------------------------
#!/bin/bash
# CPUmon 221227 - displays CPU temperature, frequencies and usages
# requires xterm, sensors and cpufreq-info (from cpufrequtils)
# uses /dev/shm for temp files
maxcpu=11    # number of cores minus 1
sensorid="Tctl:" # sensor to read
if [ "$1" = "doit" ];then
 stathead=$((maxcpu + 2))
 clear # clear screen
 echo -ne "\033[?25l" # make cursor invisible
 # read /proc/stats and write file with entries for cpu[n] runtime idletime,
 # first line is "cpu" with overall stats, additional lines cpu0 cpu1 etc
 # runtime calculated by adding system nice and user times together
 cat /proc/stat|head -n$stathead|\
      awk '{print $1" "$2+$3+$4" "$5}'>/dev/shm/stats2.tmp
 while true;do # loop until ctrl-c or window closed
  sleep 2  # seconds between updates
  # copy previous stats to temp file
  cp /dev/shm/stats2.tmp /dev/shm/stats1.tmp
  # refresh current stats
  cat /proc/stat|head -n$stathead|\
       awk '{print $1" "$2+$3+$4" "$5}'>/dev/shm/stats2.tmp
  # combine previous and current stats and compute CPU usages
  # stats variable contains lines for cpu[n] percentage (one decimal place)
  stats=$(paste /dev/shm/stats1.tmp /dev/shm/stats2.tmp|\
          awk '{print $1" "int((($5-$2)/(($6-$3)+($5-$2)))*1000)/10}')
  echo -ne "\033[H\033[0;36;40m" # home cursor, set initial text color
  echo # print CPU temp
  echo " $(sensors -f|grep "$sensorid")  "|grep --color "+.*$"
  echo
  # set colors and print overall cpu usage from stats variable
  echo -e "\033[32m Overall CPU usage:\033[33m     $(echo "$stats"|\
       grep "cpu "|awk '{print $2}')%   "
  echo
  for i in $(seq 0 1 $maxcpu);do # loop i from 0 to maxcpu
   # set color, print CPU label, tab/set color, print CPU freq (no newline)
   echo -ne "\033[32m CPU$i \t\033[35m   $(cpufreq-info -c $i -fm)   "
   # tab, set color, print cpu usage from stats variable
   echo -e "\t\033[33m$(echo "$stats"|\
       grep "cpu$i "|awk '{print $2}')%   "
  done
 done
else
 xterm -geometry 32x$((maxcpu + 7)) -e "$0" doit
fi
--------------- end CPUmon -----------------------------
It should produce a display something like this...
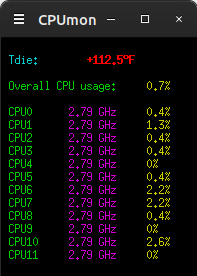
12/27/22 - For some reason in the CPUmon script above the "Tdie:"
sensor no longer works, had to change it to "Tctl:" (while at it
updated the script so that it requires less editing for a
different number of cores). Had to do the same in Gnome Panel's
temp display applet, some update or something. But overall my
hacked Ubuntu 20.04 with Gnome Panel and Caja and Mutter has been
reasonably stable. There have been a few glitches - occasionally
video playback would freeze requiring logging out and back in but
that hasn't happened in awhile (probably buggy NVidia drivers that
got updated), sometimes if I copy or move stuff too fast Caja
would freeze but after a bit it would unfreeze by itself (and
learned to move slower), and occasionally Caja would outright
crash (like when trying to view properties of a snap folder), for
that made a Gnome Panel shortcut to caja -n --force-desktop to get
it back. No big deal, outright system crashes have been very rare.
I'm trying out Ubuntu 22.04 in VirtualBox - can be hacked into
submission but haven't figured out theming with the Gnome Panel
flashback session yet so have it set to Mate for the moment. The
desktop icons package for the flashback session is improved, but
it's still far from working for me - I need a desktop that does
just about everything the file manager does (because ideally it is
the file manager). Thank goodness for Caja and Mate. I was a bit
surprised that Gnome Panel is still around. Gnome Shell, that's a
hard no for me. Wayland doesn't work under VirtualBox (and never
has on my real system, presumably because of NVidia). My current
system works well and now that there's AppImage, FlatPak and even
Snap I have no compelling reason to upgrade to 22.04 at this
point, I can still have the latest versions of major apps if I
want.
Of the new distribution formats my favorite for simpler apps is
AppImage - it's just a binary you stick somewhere and run it, user
is responsible for making menu entries, symlinks, updating etc.
For more complicated apps FlatPak is nice, it takes care of making
menu entries and updates (when I want), currently the only FlatPak
app I have is the latest KiCad but that will likely change.
FlatPak installs are actual files (under /var/lib/flatpak) that
can be browsed and manipulated if need be (but that's probably
discouraged), faster to load but uses more disk space. AppImage
packages are self-mounting compressed file systems, the files are
accessible only when the app is running and cannot be modified.
Snap... it's kind of like FlatPak but the file systems are
compressed and mounted all the time, and updates are performed
with regular updates except it doesn't tell me what it's updating
and it doesn't remove the previous versions of apps.. I guess I
need to make a script for that. Not crazy about the Snap format
(especially being mounted all the time polluting my df listing)
but it's the default for Ubuntu and I have several Snap apps, they
work. All of these formats pretty much solve the previous issue of
requiring the latest operating system to run the latest version of
something.
So yay, upgrading my OS is not as important now. Then again I ran
Ubuntu 12.04 until my previous computer literally died, and on the
Windows side of things 32-bit Windows 7 (in VirtualBox) is still
my main workhorse (got Windows 10 too but it's slower, doesn't
work as well, and only good for new stuff that won't run on 7).
So on to 2023, Happy Holidays and Happy New Year! Peace.
1/1/23 - WooHoo. Not much on resolutions and all that but one
thing I want to get a handle on soon is making halfway
decent-looking GUI apps - my programs tend to look like they came
from the early '80's with 1) 2) 3) menus and all that. Which works
fine but the newer generation and the fine folks I work for kinda
wonder about me sometimes. I'm fine but not so fine with modern
programming languages and environments - why the heck does
everything have to be so darn difficult? I'm mainly a BASIC (or
something like it) programmer but I can deal with C or Pascal or
other languages, the main reason I like BASIC is because that's
what I grew up with and the less I have to refer to docs for the
basics the more I can get done. Cross platform is nice but mainly
need to target Windows so that eliminates Gambas. I like FreeBasic
a lot but to do anything graphically requires handling everything.
Same with BBC Basic, both of these can make me Windows binaries
that work but don't do much for me in the pretty GUI department.
There's Lazarus for Free Pascal but so far haven't figured out how
to make it work. Recently found something called BlitzMax that can
make cross platform graphical programs but it's another one where
the programmer has to basically invent their own GUI framework.
Might be missing something.
Then there's Visual Basic. I bought the VB6 learning edition over
20 years ago, and stuff I made with it back then still works today
under wine or Windows. It was so easy to make simple GUI apps!
Didn't use it that much because back then didn't really need GUI
stuff (QBasic was fine for me) but things change. I've tried to
install VB6 into wine but never could make it work right. So what
the heck installed it into my Windows 7 VirtualBox VM I use for
work stuff. First try wasn't too successful - mostly worked but
the docs didn't - but with a bit of internet help got it
installed. The main tricks are to make sure UAC is disabled and to
run the setup program as administrator, then once installed set
the VB6.EXE file for XP compatibility mode and to run as
administrator. After that could access the online docs and my old
Galaxy toy
recompiled and ran fine. Mostly.. was slightly clipping off the
right and bottom so tinkered with a few numbers in the resize part
to account for (I presume) Windows 7's fatter window borders. And
it's very fast, recompiling is instant. Compared to modern bloated
programming stuff this is like wow.
The app I want to make for work stuff is for making adjustments
to an intercom I make for Racing Radios, each channel contains a
miniature DSP chip which provides automatic gain, limiting, EQ,
background noise suppression and other cool stuff. The control PIC
uses a simple serial protocol for loading DSP code into the
onboard EEPROM and changing the settings for that code.. right now
I'm using a FreeBasic console app for this but it's very crude - I
want something that has sliders for gain EQ and other variable
settings and checkboxes for on/off features. The learning edition
of VB6 doesn't provide access to the serial port but there's a
wrapper called XMComm that I've used before and is still
available. Another workaround would be to shell to something made
with FreeBasic.
Why bother with VB6 when VB.Net is free now? Probably a good
question. I have it installed in my Win10 VM and it does work,
it's just a whole lot more complicated (!!!). Instead of making a
single standalone EXE, even for a simple console app it makes an
EXE, a DLL, a PDB file (?) and a couple of JSON files, all but one
(the deps json) were required to run the program (a simple tiny
basic interpreter console app). Plus the dot net 6 run time which
was a bit hard to find.. MS edge knew I was using Win 7 (because
it told me) and "some results were removed", had to drill down a
bit to find an installer for 32 bit Windows 7. They really don't
want people running old OS's but that is not my reality. Old VB6
apps were so common that chances are the runtime is already
installed. So.. I don't know, will keep plugging with VB.Net but
in the mean time can be actually making stuff that works.
11/10/23 - It's been awhile since I made an entry here, busy with
work and there hasn't been much of significance to report but I
have been dabbling with a few things.
Still using Ubuntu 20.04 with my custom "flashback" session with
Mate's Caja file manager handling the desktop, still using
SeaMonkey Composer to make my web pages, my VIMconvert script for
colorizing code works great and seems to work better after a
recent SeaMonkey update - colorized code copy/pastes very cleanly
from SeaMonkey Browser to Composer, no extra newlines. Still using
IrfanView under wine as my primary image editor, running a fairly
recent wine 8.0.2 from the winehq repository, it's not perfect but
works quite well for simpler Windows apps. I'm running MATE on the
shop machine, basically a twin of my main machine that I bought
after I thought my motherboard was on fire. MATE's panel
isn't as fancy as Gnome Panel but it works fine. Only thing I had
to do was install Caffeine Indicator (and remember to activate
it), otherwise it turns off the monitor after a period of time,
which is inconvenient when it is showing a schematic of something
I'm working on. Probably something to do with my hardware, doesn't
happen when running in VirtualBox.
The Ubuntu 20.04 operating system itself is mostly boring and
functional and lets me do my work, it might be slightly outdated
but for the most part that doesn't matter, more and more apps are
being packaged as AppImage, FlatPak or Snap which permits running
the latest versions of apps regardless of the OS version and
without having to replace other installed versions. AppImage is
the simplest, little or no OS support is needed, they're just
binaries that can be run from anywhere. I have to make my own menu
entries and launchers and manually update as needed, to keep
things easy I make short name symlinks to the appimage files so my
menu entries won't change when I update an app.
FlatPak and Snap have a repository and update system, and usually
take care of making menu entries and/or installing symlinks for
integrating into the system. I much prefer the FlatPak system the
apps start much faster and it's not so much "in my face". Snap on
the other hand would update whenever it wanted do to the point I
had to disable automatic snap updates, but the manually-run system
updater never worked properly for snaps. Here are the scripts I
use to keep FlatPak and Snap packages updated, and for Snaps
delete unused runtimes...
------- begin updateflatpak --------------
#!/bin/bash
if [ -t 0 ];then
 echo
 echo "This script will update all flatpak packages and"
 echo "remove unused packages. Press any key to continue..."
 echo
 read -n 1
 echo
 flatpak update
 echo
 echo "Removing unused packages..."
 echo
 flatpak uninstall --unused
 echo
 echo "----- press any key ------"
 read -n 1
else
 xterm -geometry 120x40 -e "$0"
fi
------- end updateflatpak ----------------

------- begin updatesnaps ----------------
#!/bin/bash
# refresh all snaps then remove all disabled snaps
if [ -t 0 ];then
 echo
 echo "This script will update all snap packages as needed then will"
 echo "remove all disabled snap packages. Press any key to continue..."
 echo
 read -n 1
 echo
 sudo snap refresh
 echo
 snap list --all | grep "disabled$" \
  | awk '{ print "sudo snap remove --revision="$3 " --purge " $1 }' | bash
 echo
 echo "----- press any key ------"
 read -n 1
else
 xterm "$0"
fi
------- end updatesnaps ------------------
Flatpak is easier to deal with and as far as I can tell doesn't
hold on to dead dependencies, the script is mainly to run the
update command in a larger terminal to view its cool interface .
Snap made me write a command grep awk bash pipeline just to remove
old versions of dependencies, first time I ran that script it
recovered several gigabytes.
I have 22.04 running in VirtualBox, evaluating if I might want to
upgrade... not all that impressed. MATE is OK, but the "flashback"
session has deteriorated. Could only get it to work with the
Metacity window manager (although that is somewhat improved), on
my 20.04 system I usually use Mutter. Gnome Panel - my primary
interface on my 20.04 system, is obviously an unwanted cast-aside
at this point - logged into the flashback session (in which I had
already configured to use Caja for the desktop because they
lobotomized Nautilus but otherwise hadn't done much to), tried to
add a terminal to the panel... it added a clock instead. Really? I
cannot see myself continuing with Gnome past 20.04 when it can't
get even the most simplest basic things right, it's like nobody
even bothered to try it past booting to see if it even actually
worked. But of course, Gnome wants the panel with desktop icons
thing to go away as it doesn't meet their vision. But their vision
does not meet my needs and they took away the options that did
meet my needs. So I guess it's MATE or XFCE for future systems.
Then again I ran 12.04 for over 8 years until I finally got tired
of incompatibilities.
Updated my old minute timer script, now it
uses zenity's progress bar feature...
------- begin minutetimer -----------------
#!/bin/bash
# minutetimer 230115
# a simple timer.. enter minutes to delay then it pops up an
# alert after that many minutes have passed. Floating point ok.
# shows a progress bar now.. cancelling the progress bar closes
# the bar but does not cancel the actual timer
# caution... not much error checking when entering minutes
if [ "$1" = "showprogress" ];then
 # sleep interval=seconds/100
 interval=$(echo -|awk "{print $2 / 100}")
 (for i in $(seq 1 100);do sleep $interval;echo $i;done)|zenity --progress \
 --title "Minute Timer" --width 300 --text "Waiting $2 seconds..." --auto-close
 exit
fi
minutes=$(zenity --title "Minute Timer" --width 300 --entry --text \
 "Enter minutes to delay..." )
if (echo "$minutes"|grep " ">/dev/null);then minutes="";fi
seconds="";if [ "$minutes" != "" ];then
 seconds=$(echo -|awk "{if ($minutes>0) {print $minutes*60}}")
fi
if [ "$seconds" = "" ];then
 zenity --title "Minute Timer" --width 300 --info --text \
  "Not running."
 exit
fi
# show a progress bar display in a background process
$0 showprogress $seconds &
sleep $seconds
zenity --title "Minute Timer" --width 300 --info --text \
 "It's been $minutes minutes ($seconds seconds)"
------- end minutetimer -------------------
Despite the progress bar running in a separate shell and calling
sleep 100 times with an awk-calculated period, at least for short
intervals the progress bar closes pretty much exactly when the
"It's time" message pops up. I use this script so I won't burn my
pizza.
Artificial Intelligence - Recently large language models
(LLMs) have become available that have almost uncanny abilities -
although at their core they're just advanced auto-complete
engines, they exhibit emergent behaviors that can at times make
them appear intelligent. I have not interacted with the larger
models such as ChatGPT, just toy models that can run on a regular
PC, but even these can appear to be able to reason to a certain
degree. But it doesn't take long to figure out that it is mostly
just an illusion and the quality of the output can vary widely
depending on what it was trained on. Wizard Vicuna 30B passes the
dead duck test - which travels faster, a dead duck or a turtle?
correctly noticing that dead ducks cannot travel without help -
but when asked how to listen to a listen to a vinyl record without
a record player it didn't have a clue (suggesting I borrow one)
and when pressed on how to make a mechanical record player it gave
an impressive step by step guide that didn't make any sense. But
it acknowledged that my idea of using a spinning wheel and a cone
of paper with a sewing needle in the end would theoretically work
but cautioned me that it would scratch my records. When asked
about other technical subjects it gets some things right, but gets
other things spectacularly wrong, often confusing different fields
of science which happen to use similar terminology - it doesn't
actually understand the subject matter, it just outputs
plausible-sounding text which is occasionally correct. They love
to make stuff up, which is a huge issue when trying to use them
for serious research.
One hot application of AI's like these are programming
assistance, such as Microsoft's popular code copilot service. Some
of these coding-optimized models are small enough to run on my PC
- I typed in "Write a python program that plots the Mandelbrot Set
in a graphical window." into an LLM called Code LLaMa and it made
the following program...
import matplotlib.pyplot as plt
import numpy as np

def mandelbrot(x, y):
    z = 0
    for i in range(100):
        z = z**2 + complex(x, y)
        if abs(z) > 2:
            return i
    return -1

width = 800
height = 600
xmin = -2.5
xmax = 1.5
ymin = -1.5
ymax = 1.5
dx = (xmax - xmin) / width
dy = (ymax - ymin) / height

# Generate the Mandelbrot Set
data = np.zeros((width, height), dtype=np.uint8)
for i in range(width):
    for j in range(height):
        x = xmin + i * dx
        y = ymin + j * dy
        data[i, j] = mandelbrot(x, y)

# Plot the Mandelbrot Set
plt.imshow(data, cmap='Greys', vmin=0, vmax=100)
plt.axis('off')
plt.show()
...that when ran produced this in the console...
$ python3 aimp.py
aimp.py:27: DeprecationWarning: NumPy will stop allowing conversion of
 out-of-bound Python integers to integer arrays.  The conversion of -1 to
 uint8 will fail in the future.
For the old behavior, usually:
    np.array(value).astype(dtype)`
will give the desired result (the cast overflows).
  data[i, j] = mandelbrot(x, y)
...and opened a window named "Figure 1" containing...

Not bad for a first try, normally it is drawn on its side, not
pointing up. Was not expecting it to use a matlib library for
graphics. But it seems to have gotten lucky with this example,
trying to get it to write other complete programs usually resulted
in non-functional code. It doesn't really understand the code, it
just outputs stuff that looks like code and sometimes works but
usually contains incorrect includes, syntax errors, unmatched
parenthesis etc. It works better when asked about short code
snippets with a limited number of functions, or command line
parameters.
There are unresolved questions and issues regarding LLMs. They
were trained on material from the internet and other sources, and
sometimes output copy-written material verbatim without
attribution. There is no known way to remove material already
encoded as weights in a neural network model (they don't really
know how the data maps to weights), best thing they can do in
response to take-down requests is to directly filter the output to
remove the material, or do additional training to try to make it
not talk about certain things which doesn't always work. These
models often require millions of dollars worth of compute to
encode the weights, retraining without the offending data is
usually not an option. When using for the purposes of code
creation (or any publication of the results) then the user needs
to do due diligence to ensure that the code or whatever it spit
out isn't copyrighted by someone. That little Mandelbrot program
is probably on the net somewhere in similar form. As output from
these things get posted to the internet, they begin to digest
their own (mis)information. A potential danger is someone might
believe what the AI says without fact-checking, this has happened
and sanctions imposed - don't submit AI-written documents to a
court, don't ask the AI if it wrote a particular passage, never
assume what an AI says is true. There are some people in society
that are vulnerable to plausible-sounding misinformation, this
happens all the time anyway but now we have another source of
junk.
As far as software for running models locally, I've had pretty good luck with Ollama using a simple HTML UI, and the original llama.cpp with its built-in web interface (examples/server). Keep in mind these things involve huge downloads (even small models are more than 4 gigabytes), and things move fast - once it's working updating the code usually means breaking existing models and having to download new models. Ollama is written in go, didn't have to install much to compile (basically golang then "go build ."), llama.cpp just takes a simple make. Ollama is slower but was simpler to set up and get running, llama.cpp is fast enough to usefully use the 30B 4-bit models but was a bit harder to set up, involving also building the web interface written in python.
LLMs just predict the next token (word fragment), to give the
illusion of having a conversation the prompt and the previous
output have to be fed back into the model. With these, this is
automated by a browser-based UI. For Ollama I'm using a simple UI
that permits selecting the model and typing stuff in, keeping past
context, but that's about it - model parameters (temperature
prompt etc) can only be changed by editing and regenerating
weirdly-formatted model files that reference a base model, but on
the plus side it's very easy to download supported models using
terminal commands and having optimized default parameters is
helpful, generally all I do with the model files is cut down the
number of threads so it doesn't hammer all my cores at 100% while
it's thinking.
Here's the script I use to start Ollama and the UI...
#!/bin/bash
if [ -t 0 ];then
 echo
 echo "Starting OLLaMa server..."
 echo
 cd $HOME/ollama/ollama-main
 ./ollama serve &
 sleep 1
 echo
 echo "Available local models..."
 echo
 ./ollama list
 echo
 echo "Starting Python web server..."
 echo
 cd $HOME/ollama/ollama-ui-main
 python3 -m http.server &
 sleep 1
 google-chrome-stable "http://localhost:8000" &>/dev/null
 sleep 1
 echo
 echo "+-----------------------------------------------------+"
 echo "| press enter to close status window and stop servers |"
 echo "+-----------------------------------------------------+"
 read
 echo "Stopping servers..."
 kill $(ps ax | grep "ollama\ serve"  | awk '{ print $1 }')
 kill $(ps ax | grep "m\ http.server" | awk '{ print $1 }')
 sleep 1
 echo "Goodbye"
 sleep 1
else
 xterm "$0"
fi
Running llama.cpp was trickier to automate as the launch script
has to prompt for which model to use, and the web server only
becomes responsive after the model loads. Code LLaMa suggested the
curl sleep loop, I added the dot prints.
#!/bin/bash
if [ -t 0 ];then
 echo ".-------------------."
 echo "| LLaMa Chat Server |"
 echo "'-------------------'"
 echo
 cd $(dirname "$0")
 cd llama.cpp-master/models||(echo "Model directory does not exist.";sleep 3)
 # model filenames must not have spaces
 echo "Installed models..."
 ls -ALs --block-size=1 *bin|grep -v "ggml-vocab" # list models with sizes
 models=$(ls *.bin|grep -v "ggml-vocab") # just the filenames in var
 echo
 echo "Prompting for which model to use..."
 modelfile=$(zenity --title "LLaMa Server" --width 500 --height 300 \
  --column "" --hide-header --text "Select the model to use..." \
  --list $models 2>/dev/null)
 [ "$modelfile" = "" ] && exit  # exit if canceled or no model selected
 (echo "$modelfile" | grep -q " ") && exit # exit if multiple models selected
 echo
 echo "Using model $modelfile"
 echo
 cd .. # back to main llama.cpp dir
 echo "Launching server..."
 echo
 # original name is just "server", made "llama_server" symlink so
 # it can me killall'd with a more unique name than just "server"
 ./llama_server -t 6 -m "models/$modelfile" -c 8092 &
 sleep 5
 echo
 echo "Waiting for server to start..."
 while true;do
  curl "http://localhost:8080" &>/dev/null && break
  sleep 1;echo -n "."
 done;echo
 echo
 echo "Starting Chrome..."
 echo
 google-chrome-stable "http://localhost:8080" &>/dev/null
 sleep 1
 echo
 echo ".--------------------------------------------------."
 echo "| Press enter to shut down server and close window |"
 echo "'--------------------------------------------------'"
 read
 killall llama_server
else
 xterm "$0"
fi
These scripts are specific to my setup, and may not be compatible with newer versions of the LLM engines and web interfaces, if using adapt as needed. The press enter parts at the end are important, while google-chrome-stable currently blocks until the browser is closed (for now, that is not guaranteed), firefox and other browsers do not, so something has to catch the thread before killing the server. Also handy for scrolling back in the terminal.
DIYLC - Here's something I made with the DIY Layout Creator program...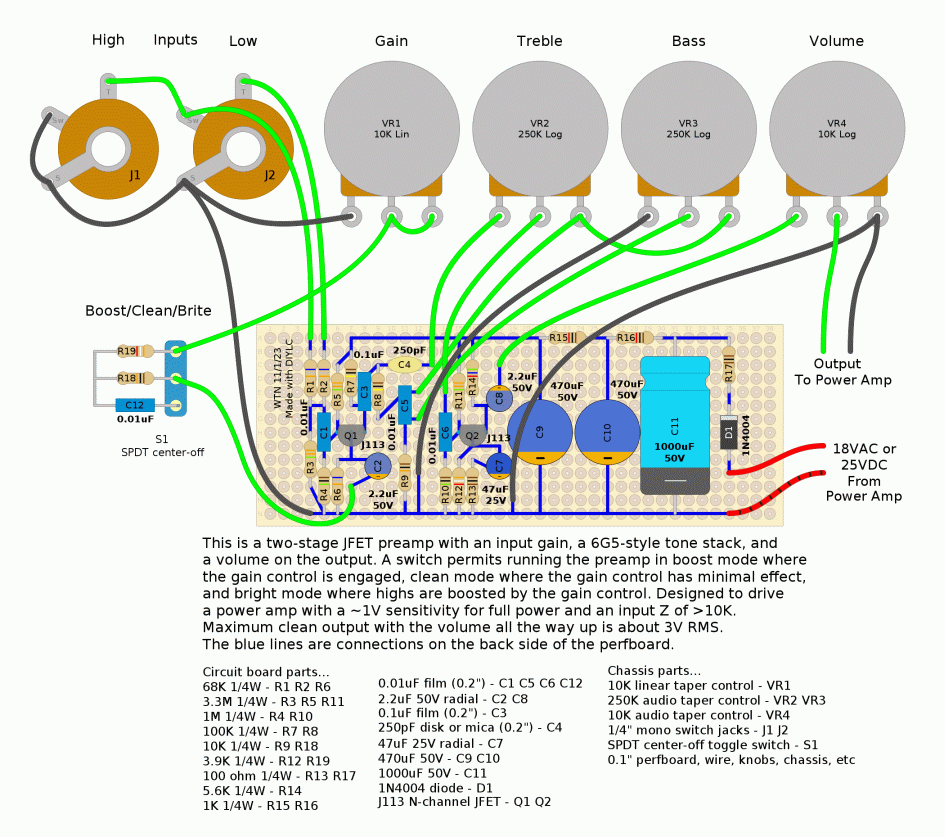
...that's just, wow! I'll be using DIYLC from now on for
amp-related builds like this, it's much faster than figuring out
layouts on paper or while building the circuit, and for the kinds
of things it's good at (amps pedals guitars etc) it looks awesome
- I've been seeing similar diagrams lately and was wondering how
they were being made, now I know. This particular circuit is still
a work in progress, part of a repair I did at the amp shop, came
out nice! The amp it was paired with was an old Polytone 55W power
amplifier but was missing the preamp section so had hardly any
gain. This preamp solved that problem! Nice and warm in the clean
and brite switch positions, and will get a little dirty in the
boost switch position. The power amp already had an 18VAC
transformer winding I could use so went with that. It will also
run from a DC source, about 25V as-is but if the power is fed into
R15 instead then D1 C10 C11 R16 and R17 can be eliminated and the
circuit can run from an 18V source. Adjust the values of R6 and
R12 as needed to bias the JFETs so that the drains rest at about
1/2 to 5/8 of the supply voltage give or take.
It's that time of year, Merry Christmas and Happy Holidays.
Waiting for it to happen so a few more topics to consider...
The State of the Linux Desktop - well, it's declining for
me, as in becoming less useful making it harder to consider
upgrading from my highly functional Ubuntu 20.04 desktop. So long
an the MATE project continues I will be OK, it does pretty much
exactly what I want. I still prefer my hacked Gnome Panel / Caja
solution, it's basically pretty much like MATE (and uses some of
its components) but with the Gnome 3 session files I can define my
own setups that appear on the login screen. Not that I've done
that in awhile, not since defining separate mutter, compiz and
metacity sessions. The nice thing about doing this is the session
name appears in the environment so my startup script can start
different things. I prefer Gnome Panel over MATE's panel, it has
better widgets and seems to be more robust, but I don't know how
long it will remain supported. I can make the newer desktops work
(by a certain limited definition of "work") but they are much
slower for my work flow - I have dozens of work projects going on
at the same time and each one has their own symlink on my desktop
to its particular top folder, arranged around the perimeter of my
screen so I don't have to move much or at all to get to them. I
often have to work with multiple things at once. Gnome's vision
would have me on a desktop with no icons, running one app at a
time full screen, with an app menu that has no hierarchy. Sorry,
it might be beautiful and appeal to cell phone users, but it
greatly amplifies the number of clicks and how much I have to
remember to find something, so that just doesn't work for me.
There's a reason why Windows remains the #1 desktop (although
they've been back-sliding too on the interface, at least core
desktop functionality remains intact and pretty much as it has
been since '95). I hope that in the future Gnome Panel remains an
option and the MATE project continues to succeed.
X Vs Wayland - Lately there is much rumbling about
depreciating X-windows in favor of Wayland. No doubt Wayland is
more modern and more secure and X is full of ancient warts, but
just one problem - Wayland has Never worked right on any computer
I have ever had, whereas X works perfectly for my use case (one
monitor and in the rare occasion I do need another monitor - if
even possible with my current system - it will be similar
resolution and the same DPI). When Wayland actually works with
NVidia graphics and has fully operational solutions for common
stuff like taking screen shots of specific windows (something I
need to do all the time) then it is not a viable solution for me.
They might have solutions for screen shots and screen sharing now
but given that the concept is in direct conflict with the goal (no
app should be able to see the contents of another app's window),
somehow I don't expect such solutions to be as convenient as X.
The whole window isolation thing is just a bunch of security
theater to me anyway - to be useful almost every app I use has to
have file access to my home directory, and at that point being
able to see the contents of other windows is not even a blip on my
concerns - if ANY of the apps I use contain malicious code in them
it's already game over. There are already several solutions for
app and window isolation for untrusted software that work well
with X and do not require lobotomizing every app I use (besides
the main reason I'd want window isolation - passwords - was a
solved problem decades ago). Personal computers, especially my
computers, are not subject to the same threat model as cell
phones, where there is little opportunity to vet and monitor what
apps do. There is still a lot of demand for X-windows so even as
some distributions are removing it, I hope it remains available
with minimal maintenance as a lot of people really do need it.
Don't need new features, it already works.
The idea of being able to execute malicious software and it
simply can't do anything harmful is a good thought, implemented
well it would save me a bit of effort having to research, inspect,
scan and monitor every new thing I use, but even with a very good
system at some point I will need to let it have access to my file
system so no matter go good the app isolation it's not going to
replace due diligence. That said, What Would Be Cool is if there
were a set of permissions for every app that could be easily
changed - similar to the Android model. If an app only needs
access to its own private folder and system dialog access only to
other files, there's no reason to allow full RW home access and RO
access to the entire file system. If an app doesn't need internet
it should be possible to disable internet for that app. Ditto with
other resources. Like (cough) access to the screen. Fortunately
these days the popular web browsers do have very good isolation to
handle the biggest threat - random internet stuff - but being able
to specify what individual apps can and cannot do would be a major
step forward. In the mean time, it would help if I could upgrade
my operating system to the latest version without worrying about
it breaking half the stuff I do, that would be nice.
Peace everyone!
1/15/24- Here's a fun little script that
contains a few useful scripting bits...
----------------- begin cowfortune --------------------------
#!/bin/bash
# cowfortune 240115 - pipes fortune output into random cowsay
# requires fortune, cowsay and xterm commands
if [ -t 1 ];then # if running in a terminal window
 lastcow="";cowfile="";exitflag=""
 while [ "$exitflag" = "" ];do # loop until exitflag set
  fopts="" # default fortune options
  cowfiles="/usr/share/cowsay/cows" # dir(s) where cows are
  # paths and filenames must contain no spaces, recursively searches for .cow
  cowfilelist=$(find $cowfiles -type f 2>/dev/null|grep ".cow$")
  if [ "$(echo "$cowfilelist"|wc -l)" -ge 2 ];then # enough cows
   dupe="y";while [ "$dupe" = "y" ];do # loop until different cow file
    cowfile=$(echo "$cowfilelist"|shuf -n 1) # randomly pick a cow file
    [ "$cowfile" != "$lastcow" ] && dupe="n" # if not a dupe exit loop
   done
  else echo "Not enough cows";sleep 3;exit
  fi
  lastcow=$cowfile
  cowflags="";cowbin="cowsay" # cowsay or cowthink
  # comment any of these to disable
  [ $RANDOM -lt 2000 ] && cowflags="$cowflags -b" #borg
  [ $RANDOM -lt 2000 ] && cowflags="$cowflags -d" #dead
  [ $RANDOM -lt 2000 ] && cowflags="$cowflags -g" #greedy
  [ $RANDOM -lt 2000 ] && cowflags="$cowflags -p" #paranoid
  [ $RANDOM -lt 2000 ] && cowflags="$cowflags -s" #stoned
  [ $RANDOM -lt 2000 ] && cowflags="$cowflags -t" #tired
  [ $RANDOM -lt 2000 ] && cowflags="$cowflags -w" #wired
  [ $RANDOM -lt 2000 ] && cowflags="$cowflags -y" #youthful
  [ $RANDOM -lt 7000 ] && cowbin="cowthink" #think instead
  [ $RANDOM -lt 9000 ] && fopts="-a $fopts" #include all fortunes
  [ "$1" != "" ] && clear # clear screen if parm/self-launched
  fortune $fopts | "$cowbin" -W 77 $cowflags -f "$cowfile"
  if [ "$1" != "" ];then # if any parameter pause and loop
   echo -ne "\033[?25l" # hide cursor
   read -n 1 key        # get one keystroke
   [ "$key" = "q" ] && exitflag="y" # exit if q pressed
   [ "$key" = "x" ] && exitflag="y" # exit if x pressed
  else # no parms
   exitflag="y" # exit after one run
  fi
  echo
 done # keep looping until exitflag set
 echo -ne "\033[?25h" # restore cursor
else
 xterm -geometry 80x50 -e "$0" x
fi
----------------- end cowfortune ----------------------------
This script requires fortune (from the fortunes package), cowsay
and xterm. The first thing the script does is check to see if it's
running in a terminal, if not it relaunches itself in a 80x50
xterm window, passing a parameter to enable looping. 80x50 is big
enough for most cow fortune combinations but adjust as needed. The
-W parm in the "$cowbin" command sets wrap point, should be at
least 3 less than the terminal width. If the script is run from a
terminal with no parameters then looping is disabled, outputs one
cow fortune and exits back to the terminal prompt. With any
parameter after displaying a cow fortune it waits for a keypress
(with an invisible cursor to avoid disturbing the cow), if q or x
is pressed it exits otherwise clears the screen and shows another
cow fortune.
The script uses the shuf command to select a random cow file
from a list, the original used a simple cowfile=$(ls
$cowfiles|shuf -n 1) to select a cow file, this version uses find
to create the file list so that multiple locations can be
recursively scanned for cow files. Also when looping it avoids
picking the same cow file twice, so it needs at least two cow
files to work. Assumes if the file ends with ".cow" that it's a
valid cow file, lots of opportunity here for arbitrary code
execution vulnerabilities as the cow files are actually scripts
that are run by the cowsay program. As written only cows in the
official "/usr/share/cowsay/cows" directory (and subs) are
considered, user-provided cows can be added by adding the
directory to the cowfiles variable, for example
cowfiles="/usr/share/cowsay/cows $HOME/mycows" to also select cows
from the mycows directory.
11/4/24 - Here's an improved version of my previous minutetimer script...
---------------------- begin minutetimer ---------------------
#!/bin/bash
# minutetimer 241104
# a simple timer.. enter minutes to delay then it pops up an
# alert after that many minutes have passed. Floating point ok.
# shows a progress bar, cancelling progress also cancels the timer
# accepts minutes:seconds format, must be exactly 2 numbers after :
# tries to reject invalid entries but can probably be fooled
# requires zenity plus standard linux utils (awk cut grep ps sleep)
if [ "$1" = "showprogress" ];then
 # sleep interval=seconds/100
 interval=$(echo -|awk "{print $2 / 100}")
 (for i in $(seq 1 100);do sleep $interval;echo $i;done)|zenity \
  --progress --title "Minute Timer" --width 300 --text \
  "Waiting $2 seconds..." --auto-close
 sleep 1 # wait a bit before exiting so main task can detect cancel
 exit
fi
minutes=$(zenity --title "Minute Timer" --width 300 --entry --text \
 "Enter minutes to wait (FP or m:ss)")
if [ "$minutes" = "" ];then exit;fi # exit immediately if empty entry
# if any invalid characters clear minutes to pop up error box
if (echo "$minutes"|grep -vq "^[0-9\.:]*$");then minutes="";fi
# check for valid FP format because awk thinks 1.2.3*60 = 1.218
if (echo "$minutes"|grep -q "\.");then
 if (echo "$minutes"|grep -vq "^[0-9]*\.[0-9][0-9]*$");then minutes="";fi
fi
# check for minutes:seconds format
if (echo "$minutes"|grep -q "^[0-9]*:[0-9][0-9]$");then
 minutesfield=$(echo "$minutes"|cut -d: -f1)
 secondsfield=$(echo "$minutes"|cut -d: -f2)
 seconds=$(echo -|awk \
  "{if ($secondsfield<60) {print $minutesfield*60+$secondsfield}}")
 # check results in case something went wrong
 if (echo "$seconds"|grep -vq "^[0-9]*$");then seconds="";fi
else
 seconds="";if [ "$minutes" != "" ];then
  seconds=$(echo -|awk "{if ($minutes>0) {print $minutes*60}}")
 fi
fi
if [ "$seconds" = "" ];then
 zenity --title "Minute Timer" --width 300 --info --text \
  "Invalid entry, not running."
 exit
fi
# show a progress bar display in a background process
"$0" showprogress "$seconds" &
sleep "$seconds"
# detect if user cancelled the timer
if (ps -ef|grep "$0 showprogress"|grep -vq "grep");then
 zenity --title "Minute Timer" --width 300 --info --text \
  "It's been $minutes minutes ($seconds seconds)"
fi
---------------------- end minutetimer -----------------------
In addition to integer and floating point minutes, this version
also allows specifying the delay in minutes:seconds format, there
must be exactly 2 digits after the colon. The timer can now be
cancelled by clicking cancel on the progress bar. Error checking
been improved, the previous version thought 1.2.3 minutes 1.218
seconds because that's what awk thought it was and really got
crazy with 1.2.3.4.5...
~$ echo -|awk "{print 1.2.3*60}"
1.218
~$ echo -|awk "{print 1.2.3.4.5*60}"
1.20.30.430
LOL, not a clue what's going on here, added a grep regex to
ensure the entry is in proper FP format to avoid such absurdities.
9/29/25 - I haven't made a post to this page lately, everything's
fine just didn't have anything to post. Still using my customized
version of Ubuntu 20.04, everything still works fine but on
extended updates now and that won't last forever, flatpak recently
quit supporting updates for 20.04, so eventually will have to
figure out something. But not today. But that kind of relates to
this post.
A few weeks ago, for whatever reason something decided to
scramble the positions of all my desktop icons. I was lost, it was
like a disaster had struck. I literally could not do my job. My
desktop is covered with symlinks to files and work folders, actual
folders, app launchers and stuff, with years of muscle memory
directing me where to go to find whatever thing I'm looking for.
Or in this case needed to do my job. Sure I could navigate the
file system, but that requires many clicks and most of all
remembering where in the file tree stuff is (that's what symlinks
on the desktop are for). Right in the middle of doing my
electronics work on a deadline. I could either spend minutes
trying to find each thing over and over again until I put
everything back, or spend a few minutes searching the web to
figure out where the positions of desktop icons were stored which
turned out to be "~/.local/share/gvfs-metadata/home", restored
that file from my backups and after logging out and back in my
icons were were they were supposed to be, at least the ones before
I took that snapshot. Trouble is though that file stores a ton of
file metadata, not just for icon positions. I didn't notice
anything wrong but no telling what info was lost, that file is
almost a file system of its own with tools for storing and
retrieving data from it, so restoring that file whenever something
blows up my desktop probably isn't a good idea so had to figure
out how to use the tools with a little help from other's posts
about similar situations.
Here's the script I came up with, complete with a few rants in
the comments...
------------- begin desktopicons -----------------------------
#!/bin/bash
#
# DesktopIcons script 250820
# Sometimes the desktop icon positions get scrambled, don't know why
# but it is very disruptive when that happens. Just happened and had
# to fish out the ~/.local/share/gvfs-metadata/home file from backups.
# So wrote this script to instantly restore my world next time it happens
# First thought was saving/restoring ~/.local/share/gvfs-metadata/home
# but there's no telling what else is in that file or what I lost from
# restoring it from a backup, rather each individual desktop file needs
# to be saved/restored using the gio command. Some of this was adapted from:
# https://askubuntu.com/questions/1320316/where-desktop-icon-positions-are-saved-in-mate
# But had to modify the technique to handle desktop files with spaces.
# This is specific to the Caja file manager, Nautilus used to have similar
# functionality but it was removed I guess because Gnome hates desktop icons.
# I prefer Gnome Flashback over MATE (Gnome Panel works better) but replace
# the crappy barely functional stock desktop icon thingy with Caja.
#
savefile="$HOME/.iconpositions" # directory must exist and be writable
metasave="$HOME/.iconpositions_meta"
metafile="$HOME/.config/caja/desktop-metadata"
metastr="metadata::caja-icon-position"
fileman="caja"
filemanopts="-n --force-desktop"
if [ "$1" = "doit" ];then
 echo
 echo "  Select..."
 echo "  S - Save current icon positions"
 echo "  R - Restore icon positions"
 echo "  Press key, or any other key to cancel"
 echo -n "  > "
 read -rn 1 answer ;echo
 if [ "$answer" = "s" ];then
  echo "  Saving icon positions..."
  cat /dev/null > "$savefile"
  for f in $HOME/Desktop/*;do
   p=$(gio info -a "$metastr" "$f"|grep "$metastr"|awk '{print $2}')
   echo "$f;$p">>"$savefile"
  done
  cp "$metafile" "$metasave"
  echo "  Done."
 fi
 if [ "$answer" = "r" ];then
  if [ ! -e "$savefile" ];then
   echo "  Icon positions not saved yet."
  else
   echo "  Restoring icon positions..."
   cat "$savefile" | while read -r line;do
    f=$(echo "$line"|cut -d';' -f1)
    p=$(echo "$line"|cut -d';' -f2)
    gio set -t string "$f" "$metastr" "$p"
   done
   cp "$metasave" "$metafile"
   killall "$fileman"
   nohup "$fileman" $filemanopts &>/dev/null &
   echo "  Done."
  fi
 fi
 sleep 2
else
 if [ -t 0 ];then "$0" "doit"
 else xterm -e "$0" "doit"
 fi
fi
------------- end desktopicons -------------------------------
This script as written is only for MATE or the Caja filemanager.
When run in a terminal it presents two options - save desktop icon
positions and restore desktop icon positions. It doesn't actually
save any desktop files, just the positions which are stored in the
files iconpositions and iconpositions_meta in the home directory
(edit to change). If restore is selected then after restoring it
kills caja and runs caja -n --force-desktop to restart caja and
restore the icon positions without having to log out and back on.
That's where I learned about the nohup command to detach a process
from the terminal. If not run in a terminal then it tries to run
itself in xterm (edit for another terminal) but probably didn't
need that part, usually when double-clicking a script it gives an
option to run it in a terminal.
Use at your own risk, not responsible if it blows up your
computer etc, and I'm pretty sure this only useful with MATE's
Caja file manager as that's the only one I know of that still
supports fully functional desktop icons, other desktops have icons
of sort but Caja (and previously Nautilus) supports the desktop as
if it were an extension of the file system with files,
directories, symlinks, desktop files and all. I absolutely need
that functionality, which incidentally is very similar to how
Windows treats the desktop (except it does tend to rearrange the
icons when it wants to so there have to get used to the
alphabetized order of things).
I get that free software owes me nothing, no it does not but
surely there are others like me who have better things to do than
admire a beautiful but empty desktop - some of the newer desktop
environments don't have desktop icons at all unless you add a
plugin which pretty much only supports launchers. Gnome used to
support all this and very well but someone had a vision and they
removed stuff that worked fine. Even stuff like being able to
launch scripts with no file selected, Nautilus became basically
unusable. Right now the only thing I know of that preserves my old
school way of doing things is the MATE project and its Caja file
manager. I recently got a laptop with Windows 11 on it (ugh but
once I tamed it it wasn't that bad) so installed VirtualBox to run
Linux and got the latest 24.04 LTS to test, and was still able to
set up my preferred configuration using Flashback/Gnome Panel with
Caja doing the desktop, but there's no telling how long Gnome
Panel will stick around. Sometimes I feel like a dinosaur, it's
just that the "new tidy way" of doing things multiplies the number
of clicks I have to make and the brain drain of having to remember
where everything is to do my job. This also applies to other crazy
ideas like thinking all apps should run full screen (to the point
of hiding the window buttons requiring config edits to get them
back). No I don't like stuff like that and won't use it unless
forced to but at that point I'd rather get the last working
versions of what I need and maintain it myself. Or what I'm doing
now, just not upgrade until I have to. Shiny pretty stuff is
useless to me if it doesn't let me efficiently do my job.
ssnetmon - a Network Monitor script
that uses the SS utility
12/4/25 - Sometimes I want to see a list of open network
connections, their individual data usages, along with the
applications that opened them. I've tried a few utilities
including bmon, slurm, tcptrack, iftop, nethogs and iptraf-ng.
Some of these are useful, iftop was the only one that was able to
get stats on udp connections (sort of) and iptraf-ng can examine
lots of stuff through a menu-driven interface, but none of them
did what I really wanted - a single compact window showing overall
network usage and history and a list of connections with data
usage and associated processes. I'm no network expert just a user
who would like to know such things. Turns out there's a utility
called ss that's provided by the kernel people and is present on
just about every GNU/Linux system. Unlike most of the other
utilities it does not require running as root, however it has a
ton of options and it takes a bit of work to extract the
information.
So I hacked together a bash script to do that...
This image shows the script running in a self-launched 100x30
xterm window. If it detects it's not running in a terminal then it
attempts to rerun itself in xterm (which of course won't work
unless xterm is installed), otherwise it runs in the terminal it
was executed from. As written the script uses a black background
with ANSI colors, edit the script to make ansicolors=0 to disable
color generation and use the default terminal settings.
At the top of the screen is a 3-line network usage summary
showing uptime, total received bytes since the last boot,
calculated receive bytes per second for the last refresh period,
total transmitted bytes and bytes per second, followed by a crude
network activity history display. This part has nothing to do with
the ss utility, just stuff that's useful to know. Network activity
is gathered by (hopefully) parsing
/sys/class/net/en*/statistics/rx_bytes and tx_bytes psuedofiles,
uptime is computed from /proc/uptime. Using the en* wildcard
because the interface name varies, on my 20.04 system it's named
enp5s0 but on my Ubuntu 22.04 test VM it's named enp0s3 and on a
Ubuntu 24.04 VM running on a Windows 11 laptop it's also named
enp0s3 (unfortunately that might be the last time I'll run that
VM, it no longer boots after updating but that's another story).
If the network or uptime psuedofiles can't be read then it
disables the status display.
Under the status display is the parsed output from the ss command
using the options "-HOtuapeimr" (yeah it's kind of tricky). H
tells it to suppress the header line, O to output all info on one
line for each socket, t to show tcp connections, u to show udp
connections, a to list all connections of each type, p to include
process information, e to include socket info, i to include tons
of tcp information including data usage, m to include socket
memory info, and r to attempt reverse-resolving the IP numbers
(while running press R to toggle IP resolve). For display purposes
it doesn't show the Recv-Q and Send-Q fields and shrinks the host
address, remote address and process fields to fit the available
terminal width. To avoid scrolling it only prints enough lines to
fill the terminal, (...) indicates more lines are available. The
terminal window can be resized as needed and the display will
adapt on the next refresh.
If the info returned from ss includes entries for "bytes_sent:"
and "bytes_received:" then it replaces the connection type and
state fields with those numbers to indicate the total bytes sent
and received by that socket, this information is only returned for
established tcp connections. There are no bytes-per-second
numbers, that sort of stuff has to be calculated by the app. I did
that for the status display but it would be a lot of work to do
that for each open socket for not much benefit - the total bytes
transferred over a socket is a much more useful indication of
activity than numbers that are constantly bouncing around. All
byte numbers displayed by this script are passed through numfmt to
convert to rounded figures with a maximum length of four
characters.
While the script is running, press the R key to toggle resolving
IP numbers to their names (sometimes, many IP numbers don't have
DNS entries). As written the script defaults to resolve, however
this generates a few dozen bytes of internet traffic for each
refresh. Press the X key to exit the script or just close the
window, this script does not write to files so can be terminated
at any time.
Press the I key to show all of the information gathered by ss...
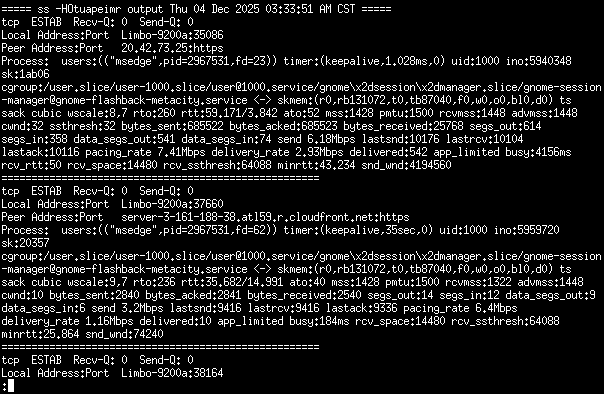
I added the Recv-Q:, Send-Q:, Local Address:Port, Peer
Address:Port and Process: labels, the rest comes from ss then
processed by awk to remove extra spaces, piped through fold -w
[terminal width] -s and then piped into the less viewer. While in
less if needed press S to save the information to a file. Press Q
to return to the monitor script.
The screenshots are using the ss binary from the latest release
(6.9.0) of iproute2, which I compiled from source (which was
refreshingly easy, just make and it worked). I copied the
resulting ss binary to my .local/bin directory to avoid
interfering with the version of ss supplied by the OS (never
replace system files - if it's in /bin /sbin or /usr/bin leave it
alone but for the user anything in the local bin directory
overrides the system version). The only really noticeable change
is the new version of ss returns cgroup info when not root, which
can help identify the udp connections.
When running as root it adds entries with the actual system
user/app names rather than just the uid's. I'm not that interested
in what the system processes are doing on the computer's the
internal network, just stuff that's using internet bandwidth. The
main thing missing from this script is being able to monitor the
data usage of individual udp sockets, which are often used when
streaming video. Maybe I can figure out how to do that but the
traffic does show up in the overall network statistics so it's not
really an issue.. if there's say 150K B/s RX and the tcp
connections aren't showing much activity then it's udp traffic.
Here's the script...
---------------------- begin ssnetmon -------------------------------
#!/bin/bash
# ssnetmon 251204
# A script for monitoring network activity...
# Uses the ss utility to gather info about network connections.
# Uses awk for parsing and FP math, numfmt for formatting numbers,
# stty for getting terminal size, fold and less for inspect report,
# plus other standard utilities present on most GNU/linux systems.
# If no terminal detected then launches itself in an xterm window, edit
# termcommand below to use something else (or run it in desired terminal).
# If enastat=1 then displays status at the top - uptime, total RX/TX bytes
# and RX/TX bytes per second followed by a crude network activity indicator.
# Status line requires read access to psuedofiles under /sys/class/net.
# While running press R to toggle IP resolve (generates net traffic).
# Press I to inspect full ss output. Press X to exit.
# Pressing any other key refreshes the display.
termcommand="xterm -geometry 100x30 -e" # terminal if no term detected
if [ "$1" = "term" ]||[ -t 1 ];then # running in a terminal
 sleeptime=5        # read timeout between refreshes
 ansicolors=1       # make 1 to use ANSI colors, otherwise term default
 enastat=1          # make 1 to display uptime and RX/TX bytes
 enausage=1         # make 1 to display bytes_sent and bytes_received
 resolve="r"        # resolve default "r" or "" (pressing R toggles this)
 options="-HOtuapeim"  # options passed to ss utility
 rxbytes=$(echo /sys/class/net/en*/statistics/rx_bytes)
 txbytes=$(echo /sys/class/net/en*/statistics/tx_bytes)
 # check for requirements
 for bin in ss awk numfmt less fold cat cut head tail sort stty;do
  if ! which $bin >/dev/null;then
   echo "Required binary $bin not found, exiting";sleep 3;exit
  fi
 done
 if [ "$enastat" = "1" ];then
  [ -r "$rxbytes" ] || enastat=2 # make sure rx_bytes and
  [ -r "$txbytes" ] || enastat=2 # tx_bytes are readable
  [ -r "/proc/uptime" ] || enastat=2 # make sure uptime is readable
  if [ "$enastat" = "2" ];then # disable stat line if not
   enastat=0;echo "Can't read statistics, disabling status display"
  fi
 fi
 s="     ";s="$s$s$s$s";s="$s$s$s$s";s="$s$s$s$s" # spaces for erasing stuff
 red=$(echo -e "\e[31m");grn=$(echo -e "\e[32m");yel=$(echo -e "\e[33m")
 blu=$(echo -e "\e[34m");mag=$(echo -e "\e[35m");cya=$(echo -e "\e[36m")
 wht=$(echo -e "\e[37m");c1="";c2="";c3="" #c1-c3 contain activity history
 fgbg=$(echo -e "\e[0m\e[30;40m\e[48;2;0;0;0m") # reset term, white on black
 csroff=$(echo -e "\e[?25l");csron=$(echo -e "\e[?25h") # cursor off and on
 t=$red$grn$yel$blu$mag$cya$wht # use all to avoid shellcheck warnings
 if [ "$ansicolors" != "1" ];then # reset color vars
  red="";grn="";yel="";blu="";mag="";cya="";wht="";fgbg=""
 fi
 sb1="┌──────────────┬─────────────────┬─────────────────┐" # box for
 sb2="│              │                 │                 │" # status
 sb3="└──────────────┴─────────────────┴─────────────────┘" # display
 if [ "$enastat" != "1" ];then sl=1 # sl for adapting display to LINES
 else sl=3;totalrx=$(cat "$rxbytes");totaltx=$(cat "$txbytes");fi
 lasttime=$(date +%s.%N) # for timing cycle time to calculate B/s
 sta="disabled";[ "$enastat" = "1" ] && sta="enabled"
 echo
 echo " *** SS Network Monitor 251204 ***"
 echo " Status display is $sta"
 echo " Press R to toggle IP resolve"
 echo " Press I to inspect ss output"
 echo " Press X to exit, any other key to refresh"
 echo
 sleep 3;echo -e "$fgbg$csroff";clear # set term colors, cursor off
 while true;do # loop until interrupted
  echo -ne "\e[H" # home, clear 1st line
  t=$(stty size);lines=${t% *};w=${t#* } # get terminal height and width
  linelimit=$((lines-sl));amul=0.271;bmul=0.567 # amul/bmul to adapt fields
  if [ "$w" -gt 120 ];then # decrease multipliers wider screen
   amul=$(echo "$amul" "$w"|awk '{print $1*(120/$2)^0.35}') # exponent for
   bmul=$(echo "$bmul" "$w"|awk '{print $1*(120/$2)^0.35}') # more space
  fi
  a=$(echo "$w" "$amul"|awk '{print int($1*$2+0.5)}') # calculate addr start
  b=$(echo "$w" "$bmul"|awk '{print int($1*$2+0.5)}') # calculate proc start
  c=$((a-13));d=$((b-a));e=$((w-b+1));f=$((c-1)) # calculate field widths
  g=$((d-1));h=$((e-1));a=$a'G';b=$b'G'          # add G to a b for ANSI pos
  netstr=$(ss $options$resolve|sort) # get sorted list of open connections
  if [ "$enastat" = "1" ];then # display status at top of screen
   thistime=$(date +%s.%N) # returns seconds.nanoseconds since 1970
   newrx=$(cat "$rxbytes");newtx=$(cat "$txbytes")
   currentrx=$((newrx-totalrx));currenttx=$((newtx-totaltx))
   cycletime=$(echo "$thistime" "$lasttime"|awk '{print $1-$2}')
   currentrx=$(echo "$currentrx" "$cycletime"|awk '{print int($1/$2)}')
   currenttx=$(echo "$currenttx" "$cycletime"|awk '{print int($1/$2)}')
   lasttime=$thistime;totalrx=$newrx;totaltx=$newtx
   trx=$(numfmt --to=si "$totalrx");ttx=$(numfmt --to=si "$totaltx")
   crx=$(numfmt --to=si "$currentrx");ctx=$(numfmt --to=si "$currenttx")
   m=$((w-54));[ $m -lt 0 ]&&m=0 # width of timeline display (min 0)
   # figure out which characters to add to activity history strings
   t2="-";[ "$currenttx" -gt 300 ]&&t2="'";[ "$currentrx" -gt 300 ]&&t2="."
          [ "$currenttx" -gt 300 ]&&[ "$currentrx" -gt 300 ]&&t2=":"
   t1=" ";if [ "$currenttx" -gt 2000 ];then t1=".";t2="'"
             [ "$currentrx" -gt 2000 ]&&[ "$currentrx" -le 20000 ]&&t2=":"
          if [ "$currenttx" -gt 20000 ];then t1="-";t2=" "
          if [ "$currenttx" -gt 100000 ];then t1="*";fi;fi;fi
   t3=" ";if [ "$currentrx" -gt 2000 ];then t3="'";t2="."
             [ "$currenttx" -gt 2000 ]&&[ "$currenttx" -le 20000 ]&&t2=":"
          if [ "$currentrx" -gt 20000 ];then t3="-";t2=" "
          if [ "$currentrx" -gt 100000 ];then t3="*";fi;fi;fi
   c1=$t1$c1;c1=${c1:0:m};c2=$t2$c2;c2=${c2:0:m};c3=$t3$c3;c3=${c3:0:m}
   # create an uptime string
   ut=$(< /proc/uptime awk '{print int($1/60)}') # minutes since boot
   da=$((ut/1440));hr=$(((ut-da*1440)/60));mn=$((ut-da*1440-hr*60))
   [ $hr -lt 10 ]&&hr="0$hr";[ $mn -lt 10 ]&&mn="0$mn"
   [ $da -lt 100 ]&&da=$da'd';upstr="Up $da $hr:$mn"
   # show the status display
   echo -ne "$wht $sb1$red$c1\e[0K\n$wht $sb2$blu$c2\e[0K"
   echo -ne "\e[3G$wht $upstr\e[18G$grn RX:$cya$trx\e[27G$crx""B/s"
   echo -e  "\e[36G$red TX:$mag$ttx\e[45G$ctx""B/s"
   echo -ne "$wht $sb3$grn$c3\e[0K";[ "$lines" -gt 3 ]&& echo # :)
  else echo -e "\e[0k" # 1st line blank if no status
  fi
  bs="";br="";lc=0 # init bytes sent, bytes received, line count
  echo "$netstr"|while read -r ln;do # for each line read by ss
   lc=$((lc+1)) # increment line count
   [ $lc -eq $linelimit ]&& echo -ne "$blu (...)" # more lines
   [ $lc -ge $linelimit ]&& break    # exit loop if too many lines
   if [ "$enausage" = "1" ];then # find per socket usage entries
    br=$(for i in $ln;do [[ "$i" =~ "bytes_received:" ]]&&echo "$i";done)
    bs=$(for i in $ln;do [[ "$i" =~ "bytes_sent:" ]]&&echo "$i";done)
    [ "$br" != "" ] && br=$(echo "$br"|cut -d : -f 2|numfmt --to=si)
    [ "$bs" != "" ] && bs=$(echo "$bs"|cut -d : -f 2|numfmt --to=si)
   fi # only seems to work for tcp connections, ignores udp usage
   if [ "$bs" = "" ];then # if no bytes sent info then show type, tcp/udp
    echo -ne "\e[1G${s:0:5}\e[2G$red$(echo "$ln"|awk '{print $1}'|head -c 3)"
   else echo -ne "\e[1G${s:0:5}\e[2G$red$bs";fi # otherwise show bytes_sent
   if [ "$br" = "" ];then # same for bytes received
    echo -ne "\e[6G${s:0:7}\e[6G$grn$(echo "$ln"|awk '{print $2}'|head -c 6)"
   else echo -ne "\e[6G${s:0:7}\e[7G$grn$br";fi
   echo -ne "\e[13G${s:0:c}\e[13G$mag$(echo "$ln"|awk '{print $5}'|head -c $f)"
   echo -ne "\e[$a${s:0:d}\e[$a$cya$(echo "$ln"|awk '{print $6}'|head -c $g)"
   echo -e "\e[$b${s:0:e}\e[$b$wht$(echo "$ln"|awk \
        '{for(i=7;i<=NF;i++)printf $(i)" "}'|head -c $h)"
  done
  echo -ne "\e[0J" # clear rest of screen
  read -rt $sleeptime -N 1 inkey  # get one byte from stdin
  echo -ne "\e[1G$wht "  # erase key echo, reset fg color
  [ "$inkey" = "x" ] && break   # exit if X pressed
  if [ "$inkey" = "r" ];then    # R pressed, toggle resolve option
   if [ "$resolve" = "" ];then
   resolve="r";echo -n "(resolve on)";sleep 0.5
   else resolve="";echo -n "(resolve off)";sleep 0.5;fi
  fi
  if [ "$inkey" = "i" ];then    # I pressed, inspect ss output
   echo -n "$csron"
   (echo "===== ss $options$resolve output $(date) ====="
    echo "$netstr"|while read -r ln;do
     echo "$ln"|awk '{print $1"  "$2"  Recv-Q: "$3"  Send-Q: "$4}'
     echo "$ln"|awk '{print "Local Address:Port  "$5}'
     echo "$ln"|awk '{print "Peer Address:Port   "$6}'
     echo "$ln"|awk \
          '{printf "Process:  ";for(i=7;i<=NF;i++)printf $i" ";print " "}'
     echo "====================================================="
    done) | fold -w "$w" -s | less
   echo -n "$csroff"
  fi
 done
 echo -e "$csron\e[0m";clear  # restore cursor and terminal settings
else $termcommand "$0" "term" # if no term detected launch in terminal
fi
---------------------- end ssnetmon ---------------------------------
Most of the code is fairly straightforward even if dense, but
there are a few tricky parts. The part that extracts bytes_sent
and bytes_received uses the partial match operator, the condition
[[ "$var" =~ "string" ]] is true if any part of var contains
string. At first tried to use awk but the regex was giving me
grief so googled and discovered this simple solution. To extract
the desired field (if it exists) I used a for loop on the entire
line with the target code echoing the current field when it hits a
partial match, which I put into a variable. If the variable
contains something then I used cut -d : -f 2 to extract the number
after the colon.
For example...
var=$(for i in $string;do [[ "$i" =~ "label:" ]] && echo "$i";done)
[ "$var" != "" ] && var=$(echo "$var"|cut -d : -f 2)
...searches $string for "label:" and if found sets var to
whatever is after the colon, otherwise var is an empty string.
To time the refresh interval to calculate bytes per second it
uses date +%s.%N which returns the seconds.nanoseconds, elapsed
time is calculated using awk with code like this...
lasttime=$(date +$s.$N)
...do stuff...
...loop...
thistime=$(date +%s.$N)
cycletime=$(echo $thistime $lasttime|awk '{print $1-$2}')
lasttime=$thistime
...do stuff and loop...
...from that the bytes per second can be computed by subtracting
the previous byte total from the current byte total then dividing
that by the cycle time. Awk has no problems with the large numbers
but it will reduce the fractional part...
~$ lasttime=$(date +%s.%N);echo $lasttime
1764904576.491701075
~$ thistime=$(date +%s.%N);echo $thistime
1764904589.636332095
~$ echo $thistime $lasttime | awk '{print $1-$2}'
13.1446
Awk is good for complicated math too, has a lot of math functions
and operators, this script has fairly simple needs but when
calculating the display fields I used int($1*$2+0.5) to multiply
and round to the nearest integer, and $1*(120/$2)^0.35 to make the
address and process fields proportionately wider for wider
terminals. In this script all interaction with awk is done by
piping stuff into it with awk printing the results which are
collected into a variable, as in: result=$(echo $op1 $op2|awk
'{print $1*$2}')
When I made this script and realized being able to resize the
window was a necessity, at first I tried using the common $LINES
and $COLUMNS variables to get the terminal size, but that wasn't
working so well. Those variables are set by the shell (usually)
and since the script runs in a subshell it only sees the initial
values. On my system they are eventually updated to new values but
not before making a total mess of the screen for at least two
refresh cycles, functional but just not right. So instead I used
the stty size command which returns two numbers like 24 80 then
extracted lines and width from that. I could have used awk or cut
etc to separate the numbers, but instead I used cryptic bash
substitution: t=$(stty size);lines=${t% *};w=${t#* } Yeah
found that on the net.. similar to using ${f%.*} and ${f##*.} to
extract the base and extension from filename f. It's not exactly
clear what these constructs are actually doing at first glance.
Example 10.10 from this
page from the Advanced
Bash-Scripting Guide explains how it works - essentially
start with the variable name, % removes everything after the
following pattern, # removes everything before the following
pattern, * is a wild card. Single % or # removes the shortest
match, double %% or ## removes the longest match. So ${t% *}
removes everything after the first space, and ${t#* } removes
everything before the first space. Including the space. Similarly
for filenames ${f%.*} removes the period and everything after, and
${f##*.} removes everything before the last period, double ## to
include periods before the last one.
Anyway, after doing the stty size to get the terminal dimensions
resizing the terminal window has a nearly instant effect, if the
resize corrupts the display then it is fixed on the next refresh.
For this to work correctly care has to be taken to either
overwrite or clear every character of the display or garbage will
be left over.
A surprisingly difficult thing was getting the uptime, useful for
interpreting the total RX and TX bytes. Most folk use the uptime
command but the string it outputs is too long for what I needed,
even with -p, for this script I needed something more compact and
with a fairly consistent length. Trying to parse the numbers out
of the uptime command proved futile, too many output variations
and edge case failures, so instead read the psuedofile
/proc/uptime which returns two numbers like 109598.64 1278360.32 -
the first number is the number of seconds the system has been up,
the second number is the total idle time for all cores which I'm
not interested in.
The following code extracts days hours and minutes from the raw
uptime seconds...
ut=$(< /proc/uptime awk '{print int($1/60)}') # minutes since boot
da=$((ut/1440));hr=$(((ut-da*1440)/60));mn=$((ut-da*1440-hr*60))
...bash math is always integer (a decimal point is an error) but
that simplifies these calculations, da=int(ut/1440), hr=ut-da*1440
and mn=ut-da*1440-hr*60. For the display I want something like Up
1d 03:55 for one day three hours and 55 minutes, so need to add
leading zeros as needed. For long uptimes I don't need to see the
d so that's added only if the uptime is less than 100 days. From
that can put together the upstr string that's displayed...
[ $hr -lt 10 ]&&hr="0$hr";[ $mn -lt 10 ]&&mn="0$mn"
[ $da -lt 100 ]&&da=$da'd';upstr="Up $da $hr:$mn"
Awesome, with this it'll take 1000 days to stop looking pretty
and over 27 years before it overflows the allotted space.
To process the ss output lines individually the script uses while
read loops, the general form is...
outputlines=$(command)
echo "$outputlines"|while read -r line;do
 # do something with the line variable
done
The read command is built into the shell so it's fast, the -r
option tells it to treat backslashes like a regular character
instead of escaping to avoid corrupting the data.
The script uses read -rt $sleeptime -N 1 inkey to see if a key
was pressed. The sleeptime variable determines the timeout period
and thus the refresh rate and -N 1 makes it return after reading
exactly one character unless it times out. The inkey variable will
be empty if it times out or will contain the key that was pressed.
Using -n 1 works too, I used -N because at some point when working
on this I thought using -n wasn't working right but that ended up
being something else. It only matters when multiple characters are
specified, read -n 5 var for example stops reading if a return is
received but read -N 5 var waits for all five characters and
includes returns in the output variable.
12/5/25 - Here we are again, nearing the end of 2025. My thoughts
about software and Linux matters hasn't changed much since the end
of 2023 - Gnome and Ubuntu and software in
general seem to be getting worse with every new release, Wayland
still won't work for me (but is showing signs of possible
improvement), and my current Ubuntu 20.04 setup with Gnome Panel
and Caja doing the desktop works fine so I'm in no hurry to
upgrade.. at least it gets some updates through Ubuntu Pro and
developers are increasingly providing flatpak and appimage options
so (if I want to) I can run the latest versions of those apps.
The main flatpak app I have (besides games and toys) is KiCad and
I have several appimage apps including FreeCAD, Audacity, Mayo and
OpenShot. I have a few snap apps too - the latest version of
LibreOffice (that I don't use it much preferring the older
natively installed version), the latest VLC and some games and
stuff, but snap is slow and I avoid it for stuff I run frequently.
For awhile my flatpak install was broken - the apps still worked
but couldn't update or install new apps as the 20.04 repository
version wouldn't work with the new infrastructure. The fix was
simple - sudo add-apt-repository ppa:alexlarsson/flatpak - it
works fine now. For apps with a single entry point my favorite
container format is appimage, it's simple and compact and just
works. But it can't be used with apps that provide multiple
binaries (LibreOffice, KiCAD etc) and that's unlikely to change as
a core principle of appimage is one app equals one file.
I've been playing around with my new ssnetmon
script and noticed I had an excessive amount of upload activity,
like 100+ megabytes a day, even when I hadn't uploaded anything.
True, any time I click on a link it has to send the request to the
server, and my ssmon script itself sends over 100K an hour from
trying to resolve IP addresses, but 100M a day is a bit excessive.
I soon found the culprit - Microsoft Edge. Every time it is opened
it uploads over 200Kbytes to a microsoft server (by comparison
Firefox and Chrome only send about 20K when opening). It might
only do this when going to its default home page (it doesn't send
much if opening a local html file), but as far as I can tell other
than editing the command line that launches there's no way to set
another startup page. Can set a home page but even if set it still
goes to its own start page first. The real kicker is its bookmarks
(favorites) menu option hasn't worked in a long time but the
bookmarks themselves work fine, but the only way to access the
bookmarks is - you guessed it - through microsoft's home page.
So.. every time I go to another site I usually have to go through
the MS home page first and it tries to send another 200K+ data
burst, no wonder it's consuming so much bandwidth. No idea what
it's sending... lsof|grep "msedge" shows tons of open files but
when filtered to my home page it's only opening its own .cache
files, fontconfig, pki keys and .config/dconf/user, which happens
to be about 200K which made me suspicious but it's not sending
that - I temporarily moved it somewhere else and the uploads
continued (pretty much every gui opens the dconf/users files
because that's where the app settings are at). So probably nothing
nefarious just irritating and likely a symptom of an overall
software bloat problem.. but I'd like to see a dump of exactly
what it is sending. I like the way Edge works but might have to
find another browser for general surfing.
Microsoft's thirst for user data borders on ridiculous - for
awhile now they've been practically forcing Windows users to have
on-line accounts (what do they do when the internet doesn't work?
for industrial applications internet connections are explicitly
forbidden), somehow when I got my laptop that had Windows 11 I
managed to both break my existing MS account (good, I really don't
care) and somehow ended up with a local account. I booted that
laptop up the other day so I could check some stuff in the Ubuntu
24.04 VM that was on it, and was immediately bombarded by full
screen nags wanting be to enable on-line backups, enable sync and
enable one drive and none of these things had a stop asking me
option. Since server space and bandwidth for hundreds of millions
of users costs megabucks and they're not getting it from ad
revenue, the only conclusion I can come to is they (or someone
else) simply want access to everyone's files.
Finally got past all the nag screens and booted up Ubuntu 24.04
and noticed that resizing was broken for some apps like the Gnome
text editor, however I could resize the Pluma editor's window just
fine. Weird but whatever, I usually don't use stock Gnome apps if
I can help it. Having not updated the install since I installed it
months ago, I did the software update thing and disaster struck.
First it offered to do a partial upgrade, which is rare but
happens if dependencies change and the old one is blocking
something and usually sorts itself out so went ahead, rebooted,
and it came up fine (and was worried because it kept saying distro
upgrade but just updated itself to 24.04.3), running update again
fixed the issue with an outdated library, however the next time I
tried to boot it it got stuck in an endless modprobe loop. No time
right now to troubleshoot the issue, and I don't care that much
because I'll probably end up wiping that laptop and putting
something completely different on it. Although I don't use it much
when I do need it for travel etc I want something that works. The
last Windows-based laptop I had also ended up being a disaster,
tried to auto-update itself through a hotel wifi portal and
utterly f'd itself, so no more Windows on real hardware. Windows 7
and Windows 10 still work fine in VirtualBox, that's all I need
for work stuff and making sure that stuff I make works on Windows.
While it is possible that the Ubuntu 24.04 issue was a host
incompatibility or some other fluke, I'm more inclined to think I
can't trust it to be my main system and I don't want half of my
core apps to be snaps. So when I do finally have to upgrade I will
probably be looking for something else. It's been a good ride,
I've been using Ubuntu since (lemme check) 2006 and other than some
minor annoyances it has served me well, and it still does with
20.04 which after a bit of hacking works almost perfectly for me.
But the newer versions aren't passing my trial tests and between
Ubuntu pushing snaps and Gnome pushing their "vision" they're both
losing me. I just want an operating system that I can configure to
do the things I need to do then gets out of my way. I don't mind
learning new techniques but when the new way is measurably
inferior (in terms of the time and effort needed to accomplish
what I need to do) then it's time for something different.
But not today. Long live Ubuntu 20.04 with Gnome Panel and Caja
and here's to being a dinosaur...
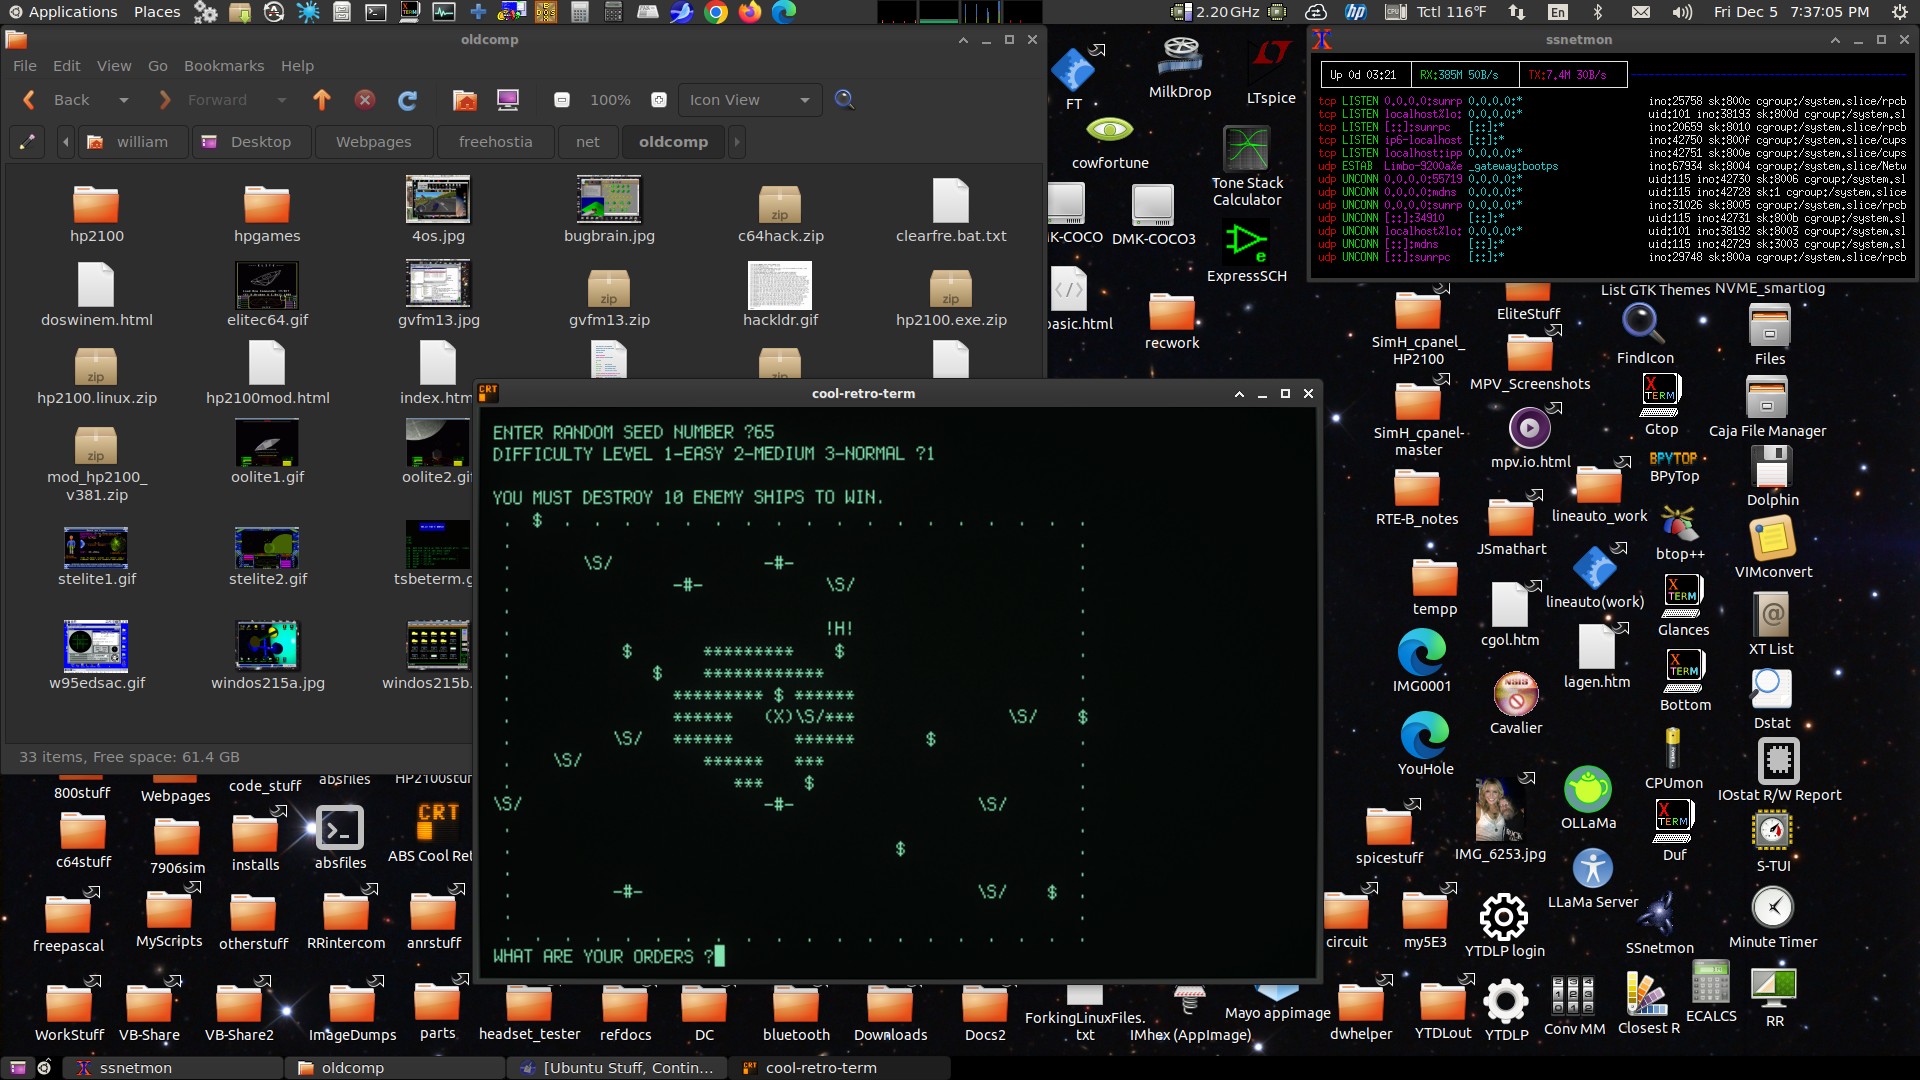
That screenshot pretty much sums up what I want my operating
system to be like.
12/13/25 - I've been playing around with the early alpha of what will become Ubuntu 26.04 LTS and it might work out after all, things have improved a lot since trying to make 24.04 work. I might have been a bit harsh towards Gnome and Ubuntu in my last post, I still have concerns but at least some appear to not be the case. My biggest concern is the diminishing support for the traditional desktop metaphor that's been the way things have been done since at least the mid 90's. Most of the new users these days were trained on cell phones and mostly consume stuff, to them the computer is just an appliance and this has become the new OS target. That's fine and is a good thing, just please don't do it in a way that makes it difficult to set up a traditional desktop. Fortunately those parts remain available.
Actually it looks great...
So long as the components remain available and working then I can
probably upgrade to the new version of Ubuntu once it becomes
stable. I hope anyway because I really would like to stick with
Ubuntu, if anything because it's probably the most mainstream of
all Linux distros and will likely be around for a long time. And I
like their philosophy.
My biggest concern with Ubuntu appears to be not the case at all
- the base image that I installed had only two snap apps (besides
the app store and related utilities) - Firefox and Thunderbird.
Everything else was natively installed. I installed a few snap
games myself but that's where snap and other container formats are
useful, it avoids installing dependencies into the main system
which makes the apps harder to fully remove. I don't mind Firefox
and other web browsers being snaps because they update very
frequently and are not a good fit for distro repositories. Mozilla
and Chrome and other web browsers provide their own repositories
for installing natively, been using them for years on my main
system. So long as they don't try to turn everything into a snap
I'm good with it.
Configuring the system to work the way I want was fairly easy -
install gnome-session-flashback, mate-desktop-environment,
dconf-editor and xserver-xorg, reboot into flashback, run
dconf-editor and go to org|gnome|flashback and turn off the
provided desktop, and make a "mystartapps.sh" (or whatever name)
file containing...
#!/bin/bash
if [ "$DESKTOP_SESSION" = "gnome-flashback-metacity" ];then
 caja -n --force-desktop &
fi
...make it executable then add it to the autostart programs.
That's where things deviated, there was no Startup Applications
app normally used for such things so made an "autostart" directory
under the ".config" directory, then in that directory created a
"mystartapps.desktop" file containing...
[Desktop Entry]
Type=Application
Exec=/home/me/mystartapps.sh
Hidden=false
NoDisplay=false
X-GNOME-Autostart-enabled=true
Name=My Startup Apps
(change the Exec line to the path and name of the startup script)
...and made it executable. Probably other ways to auto-run stuff
but that's what google told me to do.
It is very early in the development process so things are very unstable. If playing along make frequent disk image backups, expect crashes and get used to recovery mode. At the moment gdm (Gnome Display Manager that logs into the sessions) is broken for me (locks up on boot) so installed lightdm and made that the default. I'm pleased to see that they are working on Gnome Panel and Metacity on a weekend, just had some updates come through. I'm hopeful that 26.04 will eventually work for me.
Setting up Virtual Machine Manager
I'm using Virtual Machine Manager because my old VirtualBox wouldn't boot resolute, and newer versions of VB either don't work properly with my VMs or don't work at all on my system. After a bit of googling l learned that KVM with QEMU and VMM is the way to go these days, so installed it using these commands found on the internet...
sudo apt-get install qemu-kvm libvirt-daemon-system libvirt-clients bridge-utils virt-manager
sudo usermod -aG kvm $USER
sudo usermod -aG libvirt $USER
On my 20.04 system it's an older version (2019) but it seems to
work fine. Didn't take too much effort to create a new VM from a
downloaded resolute install image. One trick is to get to the VM
settings after the initial installation you have to open the VM
first (but don't start it) then click on details button or view
option. I set mine up with a 50 gig hard drive, 8 gigs of ram and
virtio graphics.
To boot straight into the resolute VM without having to go
through the manager I made a script...
#!/bin/bash
# this starts the resolute VM installed with virtual machine manager
virt-manager -c qemu:///system --show-domain-console resolute
virsh start resolute
Setting up a shared folder was a bit tricky because most of the
internet instructions were for newer versions but figured it out -
first create a folder somewhere with "777" (everyone) permissions
(I used /share in my root dir because I don't want root stuff
going on in my home directory), then open the VM with VMM, go to
details, click add hardware, choose file system, set to default
driver, mapped, source /share (or wherever the shared directory is
at) and target /sharepoint (has to match what the VM mounts). Now
boot the VM, create a /share directory, and add the following to
the /etc/fstab file...
/sharepoint /share 9p trans=virtio,version=9p2000.L,rw 0 0
Don't know what all that means but once again the internet told
me and it worked so yay. No special permissions are needed to copy
stuff to the shared directory then fish it out inside the VM,
however copying stuff from the VM to the shared directory requires
root permissions to access on the host side. Probably a way to fix
that but it's good enough for now.
12/17/25 - I'm really liking Virtual Machine Manager and KVM/QEMU
VM's, besides being able to copy/paste between the host and the
VM, discovered I could drag files to the VM and they appear on the
desktop. That's cool, but it only works one way and for single
files, can't drag a directory structure over so still need the
shared folder. What I really like about it is there is no need to
install guest additions inside the VM, the only thing that I can
tell that it doesn't do is dynamically resize the VM window but I
can live without that.
An OS has to be able to run the stuff I need or it isn't that
useful, so I've been testing. The new gcc compiler defaults to
-std=c23 which breaks some existing code, sometimes had to run the
command...
export CFLAGS="-g -O2 -std=gnu17"
...before doing ./configure to get it to compile. This included
gputils and sdcc. For another program I compiled I had to edit the
makefile to add the -std=gnu17 option. That's going to kind of be
a pain. Usually though making something compile is the same as
always, keep alternating between configure and synaptic to hunt
down -dev dependencies until it configures. Then try make which
sometimes finds other missing libraries that configure didn't test
for. Copying binaries from another system or installing binary
packages is hit and miss. Theoretically if the right libraries are
in /usr/local/lib the binary will run, but finding the right
libraries to put there is an exercise in patience.
One of my Must Have things is FreeBasic,
I have many things written in FreeBasic/QBasic including my Simple2 PIC compiler
and a serial-port-based program I use to load DSP code into
intercom channels. These things along with gputils and pk2cmd just have to
work. I attempted to move my FreeBasic binaries from my computer
to the new system but couldn't make it go. FreeBasic is odd in
that it requires a working fbc executable to compile a new fbc
executable from source - it's written in itself but that presents
a pickle when does not have a working fbc. So I searched the
internet and found a forum where someone couldn't get FreeBasic
working so someone else posted their local install to a
file-sharing service. That actually worked and I used it to
compile FreeBasic from source and install it to local, overwriting
the installation from the random internet person. I don't like
doing stuff that way but it was in a VM. So the essentials seem to
be covered: FreeBasic, simple2, gputils, SDCC and pk2cmd all
appear to work, hopefully the code output is good.
For old-comp stuff David Bryan's hp2100 simulator
compiles and works, and all of open-simh compiles
without error. My yabevolver
corewar stuff with yabasic, pmars
and pmarsv worked in binary form as-is, installed some SDL
stuff to get the pmarssdl
binary working. Compiled the latest version of YABasic. For more BASIC fun
got both the SDL and the console versions of BBC BASIC
working(compiled from the BBCSDL github),
and BaCon
(Basic
Converter) works and has a neat GUI that I don't have on my
main system. BaCon is also written in itself but solves the
bootstrap issue by supplying a bash version of the compiler.
While sometimes binaries and libraries can be copied over or
installed from binary installers and it works, seems like more
often it doesn't work or there are bugs. Probably best to
recompile from source if possible. This has always been a tricky
thing but doesn't seem any more difficult on this new system, just
sometimes needs different tricks like specifying -std=gnu17 and
getting the new libraries to work with old stuff. Which sometimes
isn't possible without going outside the box but when it comes to
mission-critical stuff right or wrong gotta do what needs doing to
make it work. Right now 26.04 is a moving target but once it
becomes the new LTS the currently maintained stuff should adapt
and things will get easier. Some things anyway, some things will
always be a pain to compile from source, especially stuff written
in new languages that deviate from the tried and true ./configure
(install dependencies) && make && sudo make
install formula.
This might be a snap permissions thing - I can't open any local
html files with Firefox. There's probably some setting somewhere
that can tell it it's ok but for now installed dillo and links2 so
I can read docs. I can't hardly use any of the supplied Gnome
apps, even terminal doesn't work right any more - if there's
already a terminal running, or an app running in a terminal, then
trying to open a new terminal just focuses an existing window (and
if there are more than one then picks one). To actually get a new
terminal then I have to click a thing on the title bar,
right-click the new tab and select move to a new window. This is
something I do dozens if not hundreds of times a day and I ALWAYS
want a new window when I launch a new instance. The run in
terminal option from desktop launchers is broken, not only because
of this but when used launches a second terminal besides the app
(oh now you want to give me a new window). I use MATE Terminal
instead and when I need something to launch in its own terminal I
either add xterm [options] -e to the shortcut or if it's a bash
script make it rerun itself in xterm if it finds itself without a
terminal. This can be done by adding the following code to the
beginning of the script...
# --- gp solution for relaunching in xterm ---------
if [ ! -t 0 ];then xterm -geometry 80x25 -fn 10x20 \
-bg black -fg green3 -e "$0" "$@";sleep 1;exit;fi
# --- regular script follows -----------------------
Of course that requires xterm. When using Caja for the desktop,
all folders open in the Caja file manager and Open in Terminal
runs MATE Terminal. But Gnome Panel defaults to Nautilus. I can't
use Nautilus. To change that entered a magic incantation...
xdg-mime default caja.desktop inode/directory
...now the Places entries open in Caja. Getting there, but
there's no way I'd be able to use Gnome as provided. Thanks to the
MATE project I don't have to. The underlying desktop functionality
seems to me intact, my AddToFileTypes
and AddToApplications scripts still work fine and Caja lets
me set up the associations the way I want. Caja permits
associating file types with arbitrary commands, that's nice and
avoids having to make scripts for everything.
Terry Newton (wtn90125@yahoo.com)