(and also a handy line driver circuit)
When working on guitar amplifiers I often need to check the bypass
and filter capacitors, especially in old tube amps. These capacitors
are usually in the 10uF to 100uF range, don't really need exact
measurements but need to quickly check them in-circuit and estimate
capacity and ESR (equivalent series resistance). I had been using my
scope's built-in signal generator for this - not useful for generating
a test signal as it was grounded to the scope common causing a ground
loop and depending on the amp being tested, blowing stuff up (the
speaker minus of an amp should never be grounded - for the same reason
I lift the ground on the scope so the chassis can float, sometimes at
dozens of volts when testing a bridged amp), but it made a great cap
tester. It had a 50 ohm output impedance, square wave mode, and with
the scope input monitoring the generator output with test leads
attached, would convert the square wave into a triangle wave when
connected to a capacitor. Typically with a 500 to 1000 hz signal it
would quickly test capacitors in the 10uF to 100uF range, if I needed
to test large caps for solid state amps I'd use a lower frequency. The
health of the capacitor was immediately apparent from the shape of the
wave, ESR translated to spikes in the shape.
Past tense because the other day I forgot to discharge and blew up
my scope's generator. Not wanting to spend $300 on a replacement (the
scope still works fine), I threw together a little battery-powered
circuit to convert my sine wave generator output into a (mostly) square
wave to do the same thing. Only now, the next time I blow it up I can
just fix it. It's essentially an amplifier with a voltage gain of about
45 so it also can serve as a signal level booster for when my little
home-made bulb-balanced oscillator can't provide enough output, and to
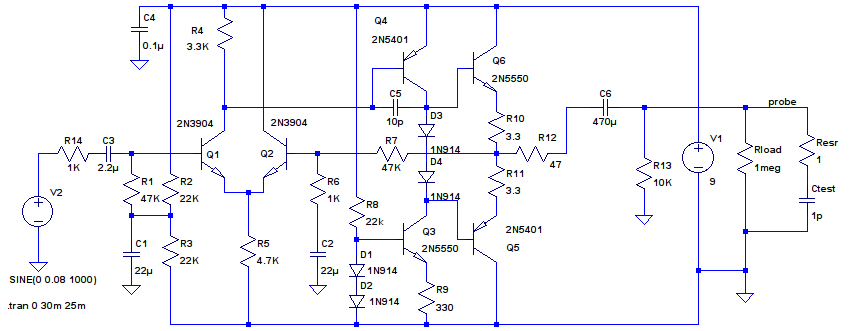
provide a signal for testing speakers. The circuit in the following LTspice simulation isn't identical to the
hobbled-together thing I made but should work better, for better
compatibility made it so both the input and output are grounded,
omitted unneeded parts and changed a few component values for better
stability.
Note... probably should also add a 22uF or more across C4 to better
smooth the supply.
V2 represents an existing sine-wave generator, I used a 1/4" input
jack. R14 avoids current flow with large input voltages. R6 sets the
gain of the amplifier, which is a typical opamp-style discrete amp,
nothing special. In mine I used 1 ohm for R10 and R11 but should be
more stable with 3.3 ohm emitter resistors. R12 sets the output
impedance - 47 ohms in the linear range, or about 50 ohms when
overdriven (emitter resistors get added in). R9 sets the current of the
driver stage... if lower impedance is needed then might have to reduce
(and maybe R8 too). I was going for minimal no-signal current drain
with a 47 ohm minimum load with the output shorted. C6 and R13 block DC
and reference the output to ground, wire the output at R13 to an output
jack. Rload, Resr and Ctest represent various output loads and the
scope probe for monitoring. Transistors shouldn't be that critical, I
used 2N3904 for the diff amp, and 2N5551 and 2N5401 for the other
transistors, these have fairly high current ability (up to a few
hundred milliamps) with reasonably good gain. Diodes can be 1N914 or
1N4148 type. Vbe of the output transistors should be slightly less than
the forward voltage of the diodes so that with no signal a few
milliamps of current flows through Q5 and Q6 to avoid crossover
distortion. Measure the voltage across R10 to make sure it's between
about 0.001V and 0.02V - if too high parallel some resistance across
one of the diodes (start with a few hundred ohms and reduce until the
voltage across R10 is about 0.003V or so) - if too low then add
resistance in series with D3/D4 (start with about 10 ohms and increase
until the voltage across R10 is about 0.003V or so). Careful... don't
let the smoke out. It's not hugely critical, so long as there's a bit
of current crossover distortion is avoided, and try to keep under 10mA
(a voltage of 0.033V with R10/R11=3.3) to avoid draining the battery
too much. These values should be fairly close. This is a hack circuit,
not refined, not for production, and might take a bit of adjustment.
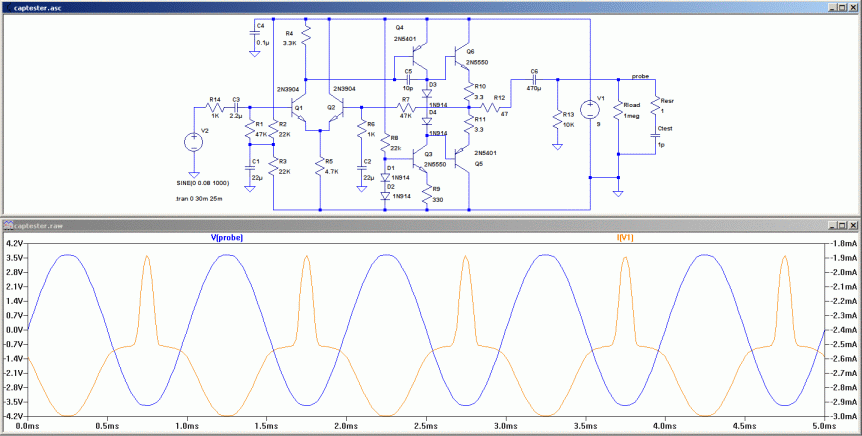
Here's the circuit running as an essentially unloaded amplifier...
Driving a 5 ohm output load...

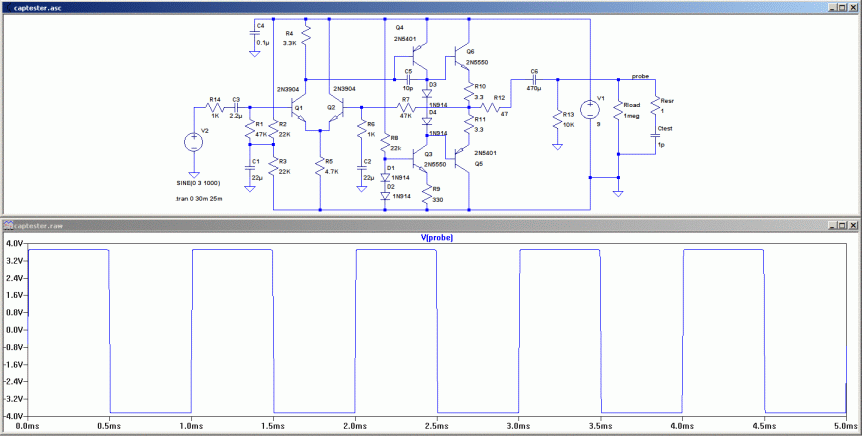
Now unloaded with a high level input (1.5V RMS or more) to drive way
into clipping...
And now the magic... with a 20uF capacitor connected to the output...

Those steps at the peaks represent ESR - this is with 1 ohm ESR, if
near 0 then it'll look more like a triangle. If the steps get too big
then there's too much ESR and the cap should be replaced. Also good for
detecting bad lead connections - as the cap is moved the spikes will
grow and shrink. For old caps using rivited connections doing a twist
with needlenose plyers often makes the variations go away - temporarily
anyway. Really should just replace old electrolytic caps, especially
the cardboard tube types from the '70's and before, if still working
they won't be for long.
Oh yea, don't forget to discharge the caps before testing! I usually
use a 470 ohm resistor jumper-clipped to the main B+ supply with the
standby switch in the powered position. Caution! High Voltage! Only
experienced technicials should attempt to service tube amplifiers!
Terry Newton (wtn90125@yahoo.com)
Last modified 7/9/2011