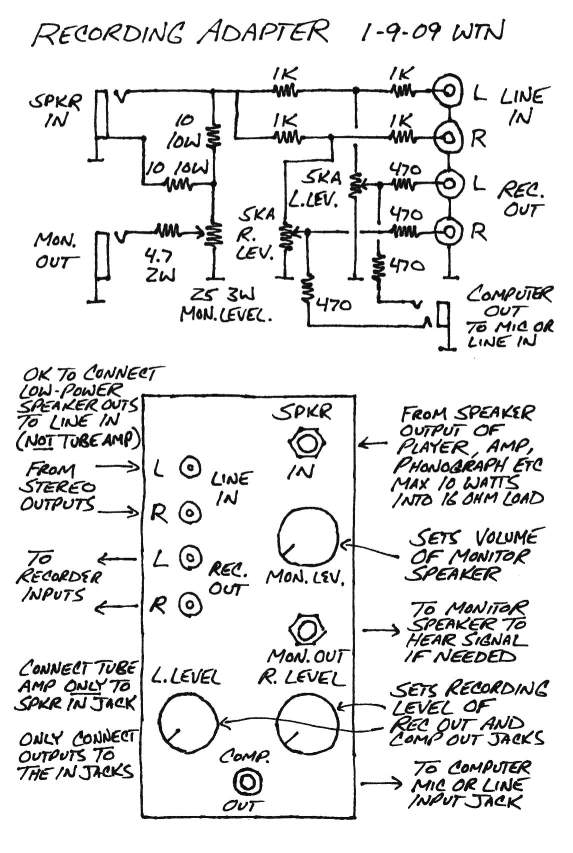
This gadget converts speaker outputs and line-level signals into a
lower-level signal suitable for feeding into a computer soundcard or
other recording device. It is specifically designed for transferring
audio from an old tube-type wire recorder or record player to computer
audio files, but can also receive signals from the line outputs of a
mixing board or the speaker or headphone outputs of a low-power stereo
or other solid-state amplifier. A stereo mini-jack is provided for
connecting to a laptop or other computer, along with RCA jacks for
connecting to other recording equipment. Only the RCA line input jacks
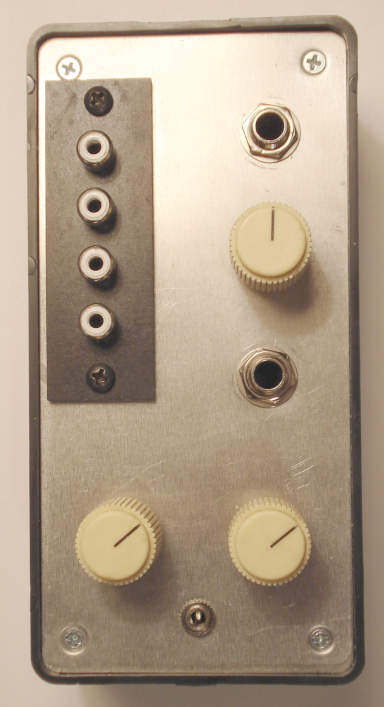
remain stereo, the 1/4" speaker input jack is split to record mono. A
1/4" monitor speaker output jack is provided to monitor the speaker
input with a level adjustment to permit raising or lowering the
monitoring volume without significantly affecting the recording level.
Construction...
The major parts to build the adapter were purchased at Radio Shack:
1 270-1805 6"x3"x2" project case
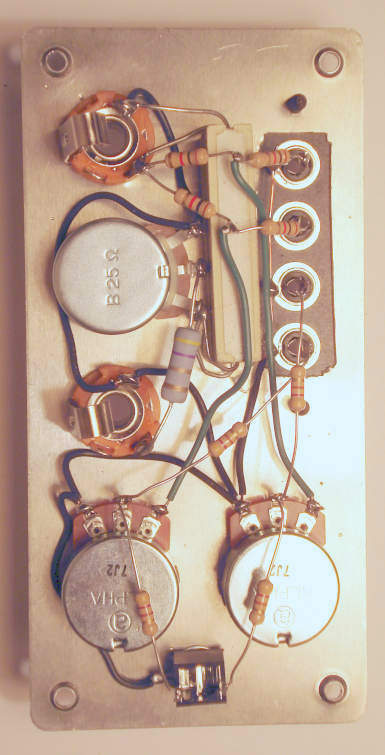
1 271-0265 25 ohm 3 watt rheostat
2 271-1720 5K-ohm audio taper potentiometers
1 274-322 four phono plug jack board
1 274-0255 1/4" mono phone jacks (package of two)
1 274-0249 1/8" stereo phone jacks (package of two)
1 271-0132 10 ohm 10 watt resistors (package of two)
1 42-2387A 1/8" stereo to 1/8" stereo cable, 6 foot long
The following extra parts were rounded up at my amp shop:
4     1K-ohm 1/2 watt "cheap" resistors
4     470 ohm 1/2 watt "cheap" resistors
1     4.7 ohm 2 watt "flameproof" resistor
3     salvaged knobs from a dead SWR amp
2     #6 sheet-metal screws
1     3/8" lockwasher (for monitor level control)
2     5/16" lockwashers (for L/R rec.lev. controls)
1     1/4" lockwasher (for 1/8" jack)
-     wire, solder, silicone, etc
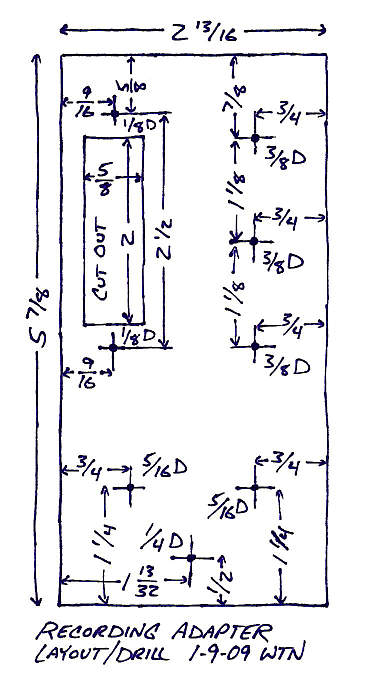
Tools used include a hacksaw and vise for cutting off the shafts of
the 5KA controls, a dremel with a cutting wheel for making the
rectangular cutout for the RCA jacks, a drill with 1/8", 1/4" and 3/8"
bits (couldn't find a 5/16" bit so used a rat-tail file to enlarge 1/4"
holes), a 1/2" bit for de-burring the holes, a triangle file for
smoothing the rectangular cutout, wire cutter, wire stripper, 1/2" and
7/16" nutdrivers, and needle-nose plyers. Total assembly time including
metalwork was less than 2 hours.
NOTE - the layout diagram is slightly wrong - the hole dimensions of
the RCA jack board should be 2 9/16" (not 2 1/2"), however this
resulted in a tighter fit so all is well (this is a record of what was
build, not what it should have been). The holes on the jack board need
to be slightly enlarged for the #6 sheet-metal screws.
NOTE - the 1/8" jack for the computer is wired tip=left and
ring=right, not verified if this is correct yet, if not reverse the
connections to the 1/8" jack if it matters.
The Radio Shack 1/4" jacks have bushings which are slightly less
than the standard 3/8" so no lockwashers were used on them, just
tighted extra tight. All grounds were wired together to avoid
connection problems should the nuts become loose. The 10 ohm 10 watt
resistors were stacked and siliconed in place to avoid movement and to
provide better heat-sinking. The other resistors were wired
point-to-point in the air with plenty of clearance to avoid shorting to
other components.
Strictly speaking only the 1K-ohm resistors are needed to mix the
speaker-level mono signal with the stereo line input signal. The 4.7
ohm and 470 ohm resistors were added to help avoid damage if
speaker-level output signals are connected to the monitor or recording
outputs but they can only go so far, values chosen to minimize chance
of damage without adversely impacting the signal quality.
Usage...
The primary purpose of this adapter is to dump the output of a
vintage tube-type wire recorder or 78-rpm record player to audio files
on a computer, which can then be transferred to CD tracks. For this
application connect the speaker output of the signal source to the
speaker input jack, and connect the 1/8" computer output to the line or
microphone input of a laptop or other computer with a typical sound
card. Typically using the speaker output jack of the signal source
disables the existing speaker so for monitoring the signal connect a
small speaker to the monitor output jack. Even with the monitor level
up all the way up, the signal is attenuated by roughly 10db, the volume
of the signal source should be turned up fairly hot but not distorting
to avoid hum or noise and the monitor level control set to provide the
desired monitoring volume.
On the laptop, install a program such as Audacity
to record the audio (for Linux use Synaptic etc).
Audacity requires the "Lame MP3 Encoder" package (or liblame0 or
similar for
Linux) to export to MP3 files so download and "install" that too by
extracting the dll from the zip file and putting it in the Audacity
program directory (C:\Program Files\Audacity, just to keep the files in
one place). Important for Vista - while in the Audacity directory
right-click the Audacity.exe file, click properties and in the
compatibility section set to XP, otherwise it hangs when recording.
Once
installed and set up, run Audacity and check the settings - sample rate
typically should be set to 44khz and for mono signal sources set to
mono. MP3 export has to be set up by using the setup dialog to navigate
to the lame_enc.dll file (for Linux navigate to where the libmp3lame.so
file got installed to, on my Eee PC 701SD it was named
libmp3lame.so.0.0.0 in the /usr/lib directory, had to set the dialog to
show all files to find it). Set Audacity so that it monitors the input
level, set the signal
source so that it's delivering a signal, and set the left and right
record level controls to provide a good signal level, but safely under
the maximum level. Typically set so peaks are between -6db and -10db to
make sure they don't get too close to the 0 mark. Also, make sure the
input level in the operating system's "mixer" is set high enough to
avoid distorting the sound card's input from sending too much signal
from the adapter, you should be able to go all the way into the "red"
(0) by advancing the adapter's level controls, then back them off.
To make a transfer, cue the signal source so that it's ready to go,
start recording in Audacity then start the signal source. When done
stop the signal source and Audacity, extra space at the beginning and
end of the track can be trimmed out. Export the track as MP3 to save.
The full uncompressed track can be saved if desired but this consumes a
huge amount of disk space so typically I don't save the "project", just
export the MP3 file (but play it first before exiting to make sure the
editing and export was done correctly). Free disk space is not
recovered until the program is exited and restarted. Once all the MP3
files have
been produced they can be lined up and burned to CD tracks using the
appropriate software.
The adapter can also adapt line level signals from a PA amp or
mixing board, connect the signal source to the line input RCA jacks on
the adapter. These can be speaker-level signals from say an inexpensive
stereo or cassette player but do not connect high-powered or tube amps
to the RCA input jacks. A 1/4" or 1/8" stereo to dual RCA adapter cable
can be used to use the headphone output of the signal source. There is
very little or no monitor output when using the RCA input jacks, if
monitoring is needed connect the monitor output jack to an amplifier to
amplify what little monitor signal there is, or connect the RCA output
jacks to a stereo amplifier. The RCA output jacks can be used to
connect to another recording setup rather than using a computer.
Caution... if connecting both the RCA line inputs and outputs to the
same system, to avoid feedback make sure the system's inputs from the
adapter's outputs do not deliver signal back into the adapter's line
inputs.
Last modified January 20, 2009
Terry Newton (wtn90125@yahoo.com)